In the second semester, I'll be taking on three more modules. Firstly, there's the "Group Client Project," which is a continuation from last semester. Then, there's the "Social Media Project," where we'll be creating our own social media platform to help with networking and promoting our work for our third year. Lastly, there's the "Year 3 Individual Study Plan," where we'll outline what we hope to achieve in our third year.
This project spanned over a period of 12 weeks, during which I embarked on a mission to promote the visibility of my work. The primary objective was to craft and execute a vibrant social media campaign aimed at drawing attention to my work ready of my exhibit at the Transmedia end of year showcase, held on Week 13 of the semester. Taking on this challenge involver to main takes; firstly, to identify key aspects within my field of expertise or those I desired to delve deeper into, and secondly, to curate compelling content for dissemination across two distinct social media platforms. One of these platforms was LinkedIn, chosen for its professional network, while the other was left open for me to select based on its compatibility with my promotional strategy. After careful consideration, I made the strategic decision to leverage Instagram as my secondary social media platform. The choice was motivated by several factors, including the platform's user-friendly interface, which facilitates seamless interaction and content sharing. Furthermore, Instagram's extensive reach and prevalence within my specific niche area played a pivotal role in my selection process. Its popularity among the target audience ensured that my promotional efforts would have a significant impact and resonate effectively with potential visitors to my exhibition stand.
For this project, I began by conducting research to determine the optimal times for posting on Instagram in the UK. I discovered various sources providing different insights. One such source, sproutsocial.com, stated that "The overall best time to post on Instagram in the UK is weekdays between 10 a.m. and 2 p.m. Midweek, engagement rates remain high until 4 p.m. Things are noticeably quieter at the weekend across many social platforms, including Instagram in the UK. Taking this into account, the best time to post on Saturday is 9 a.m. to 12 p.m. and 10 am to 12 p.m. on Sundays". Sproutsocial.com wasn't the only source I had found though. Among this one there was statusbrew.com and blog.hootsuite.com, each providing similar guidance regarding optimal posting times. According to their findings, the recommended posting times typically fell within the range of 9 or 10 a.m. to 3 p.m. These consistent recommendations from multiple sources reinforced the importance of targeting specific time windows to maximize engagement on Instagram. Armed with this information, I devised a plan using a Gantt chart to organize my posting schedule for the upcoming 8-10 weeks. Initially, I decided to align my posting times with the recommendations obtained from my research. This approach allowed me to test the effectiveness of the suggested posting times and observe how they influenced engagement with my content.
Reference 1 - https://sproutsocial.com
Reference 2 - https://statusbrew.com
Reference 3 - https://blog.hootsuite.com
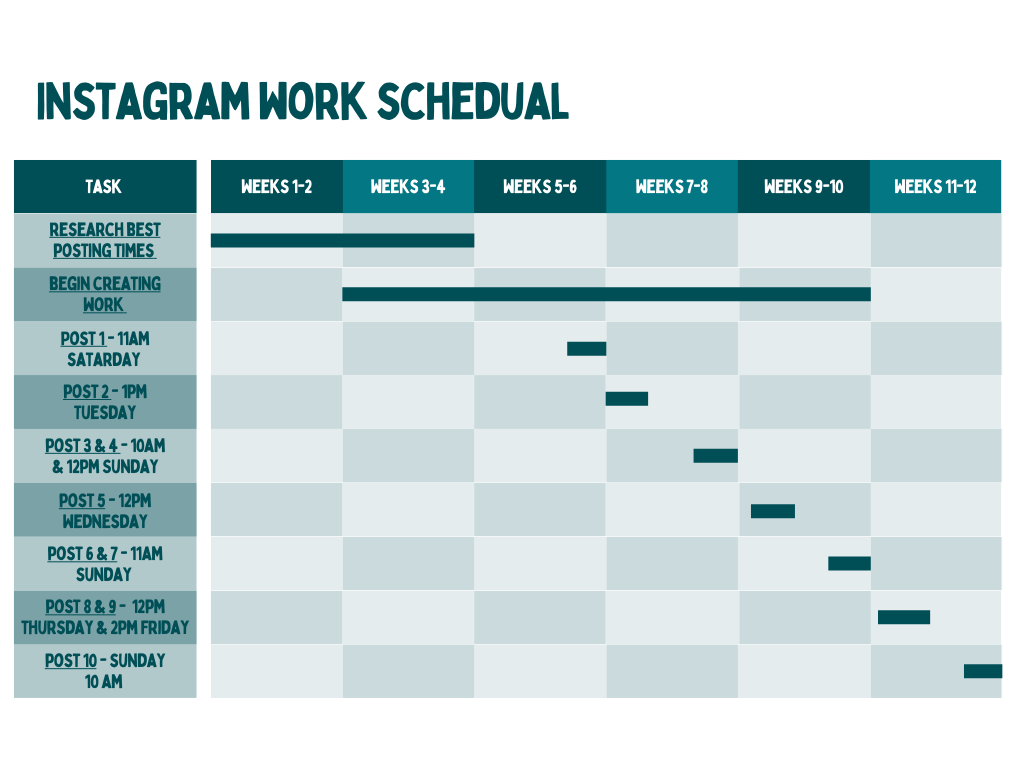
The information I gathered from the sources above is shown in the figures provided. In Figures 1 and 2, the darkest areas represent the most optimal times for posting. Meanwhile, in Figure 3, the best time is highlighted in purple and marked with a star for easy identification.
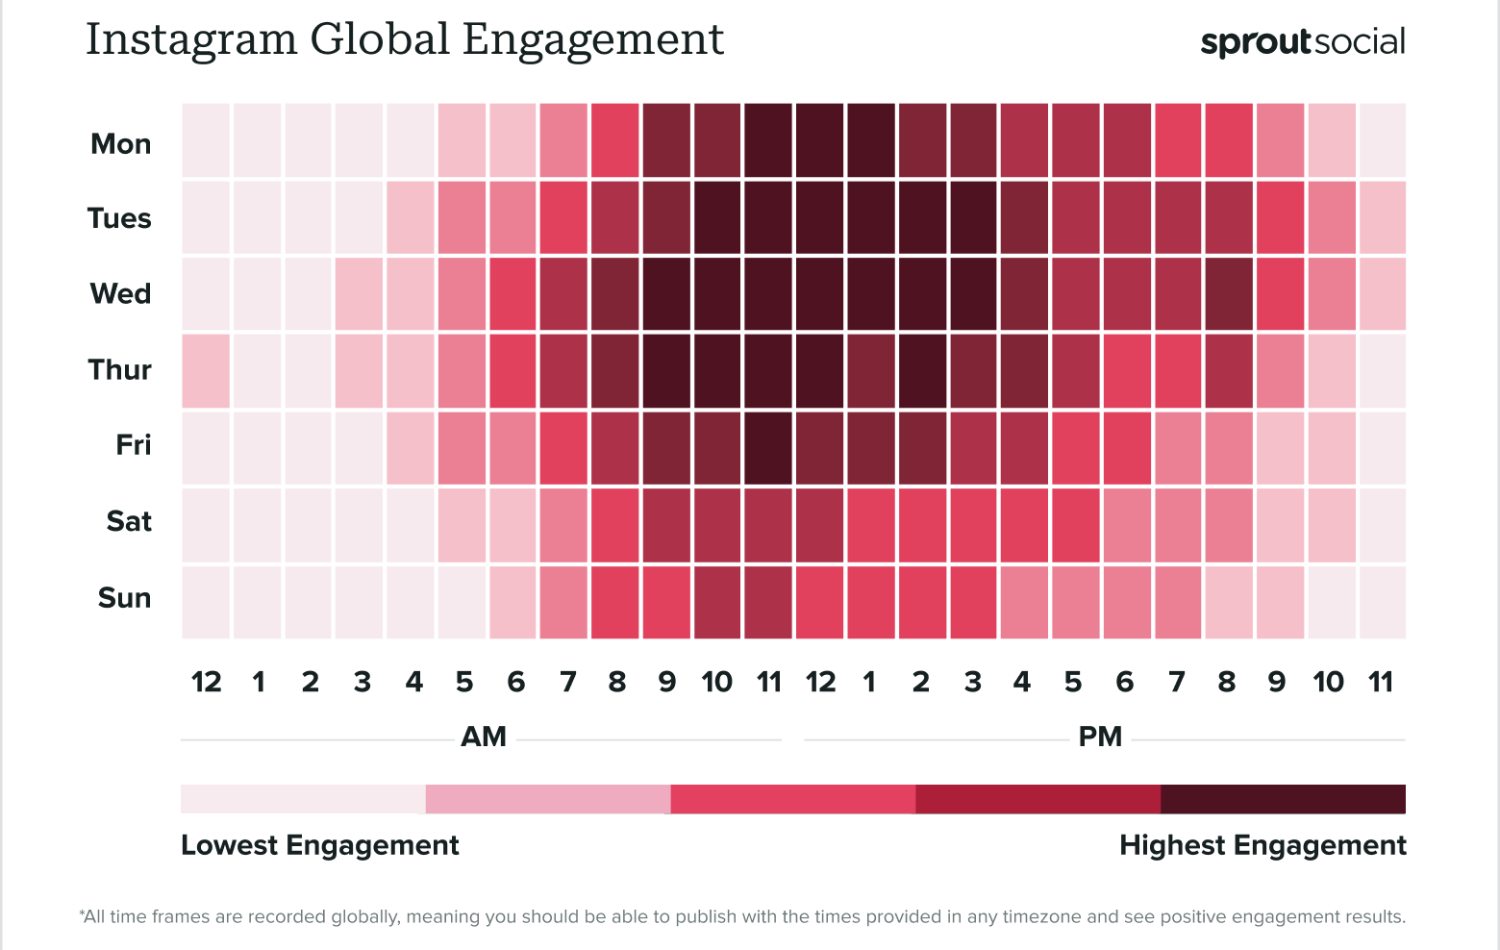
Figure 1

Figure 2

Figure 3
After devising a posting schedule for Instagram, I turned my attention to crafting a plan for LinkedIn. Once again, my journey began with researching the optimal times for posting content on this platform. During this phase, I explored several websites including buffer.com, www.hopperhq.com, and www.socialpilot.co, among others. As I sifted through these sources, I found a recurring theme in their recommendations. Many of the websites suggested similar time frames for posting on LinkedIn in the UK. They highlighted the importance of Tuesdays and Wednesdays, particularly from 10 a.m. to noon, with Thursdays also showing promise at 10 a.m. According to one source, engagement rates on LinkedIn tend to decline as the day progresses. However, amidst these consistent findings, there was a slight variation in advice from one source sproutsocial.com, which proposed that high engagement on LinkedIn could be achieved between 9 a.m. and 5 p.m. on weekdays. With these differing perspectives in mind, I faced a dilemma regarding which posting times to prioritize. Ultimately, I leaned towards the recommendations that appeared most frequently across my limited research. Once I made this decision, I utilized a Gantt chart to structure my LinkedIn posting strategy, ensuring a well-planned and organized approach to sharing content on the platform.
Reference 1 - https://buffer.com
Reference 2 - https://sproutsocial.com
Reference 3 - https://www.socialpilot.com
Reference 4 - https://www.hopperhq.com
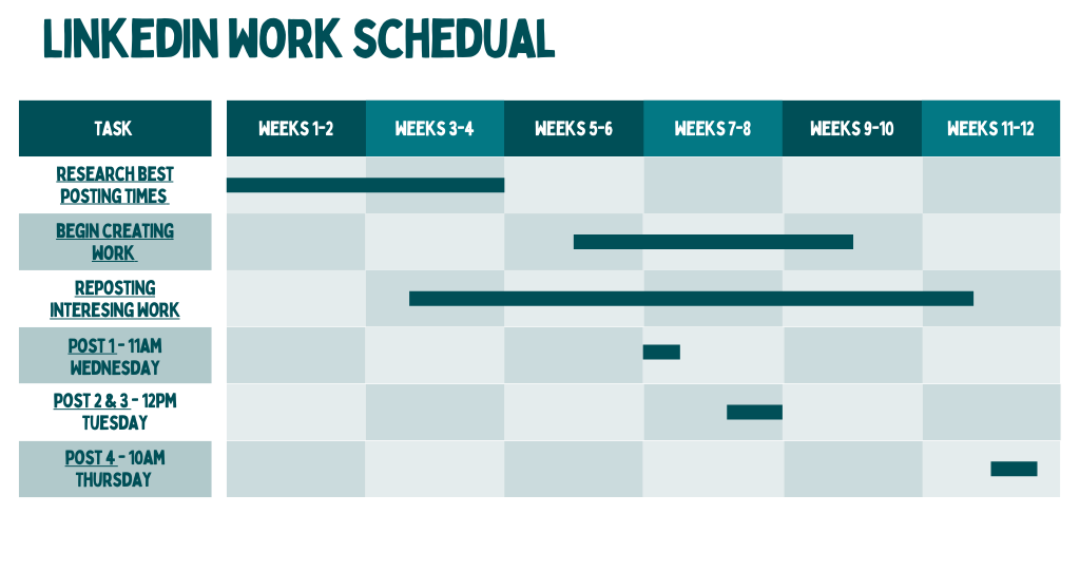
Additionally, from the data I collected about LinkedIn posting times, it's evident that the darker areas in Figures 4 and 5 indicate the best times for posting. However, in Figure 6, there isn't a specific overall best time highlighted; instead, it provides several good posting times for reference.
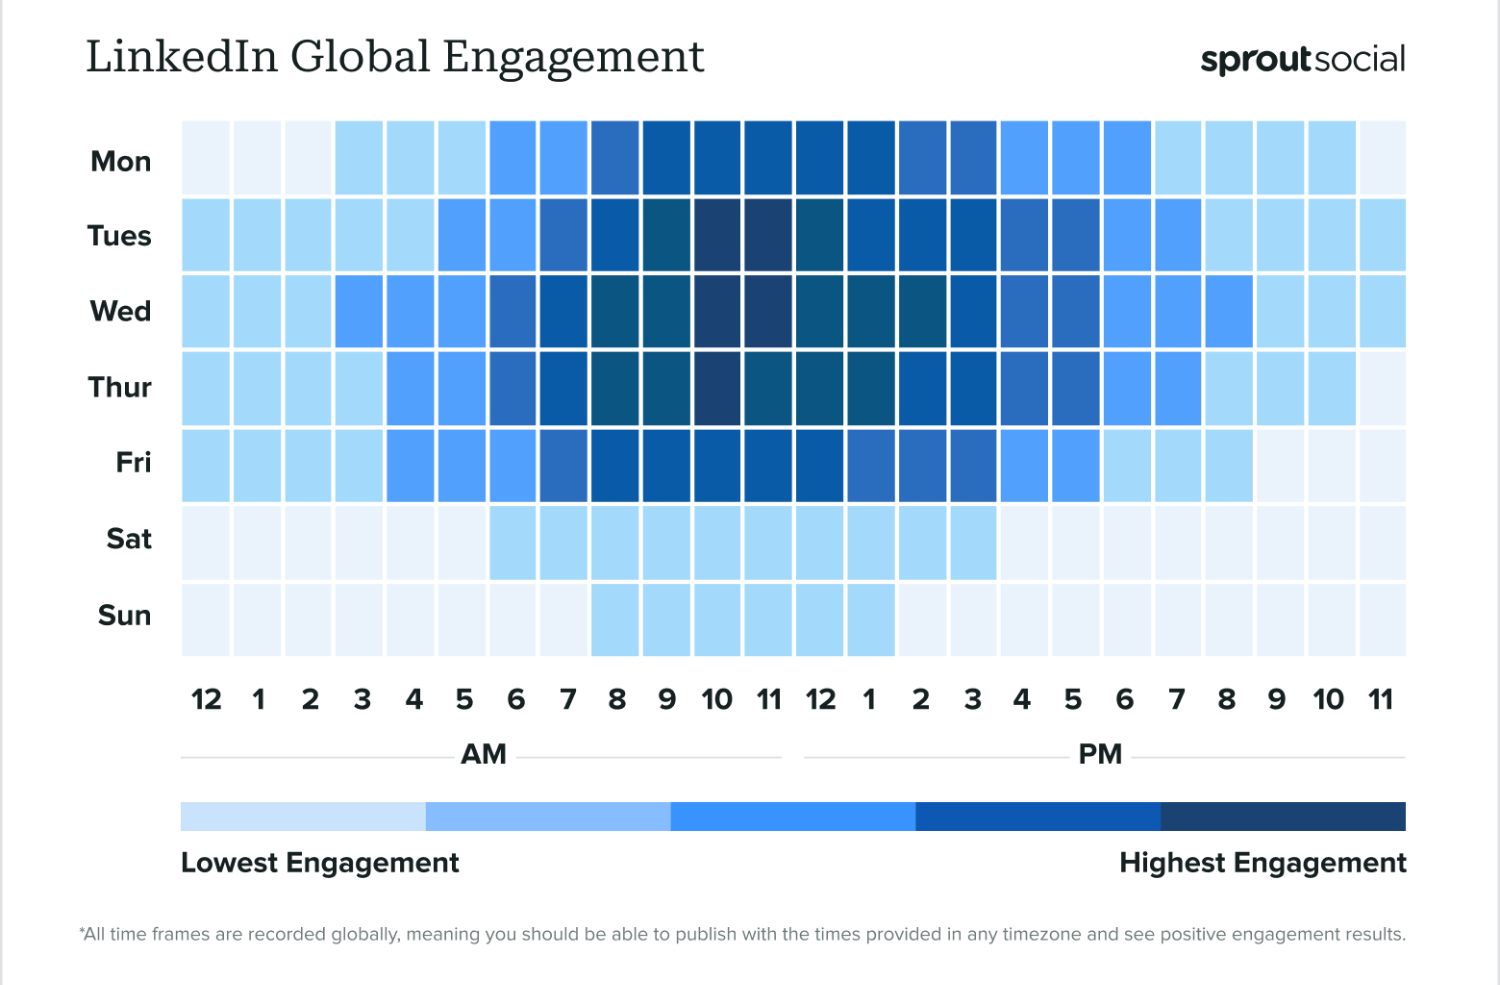
Figure 4
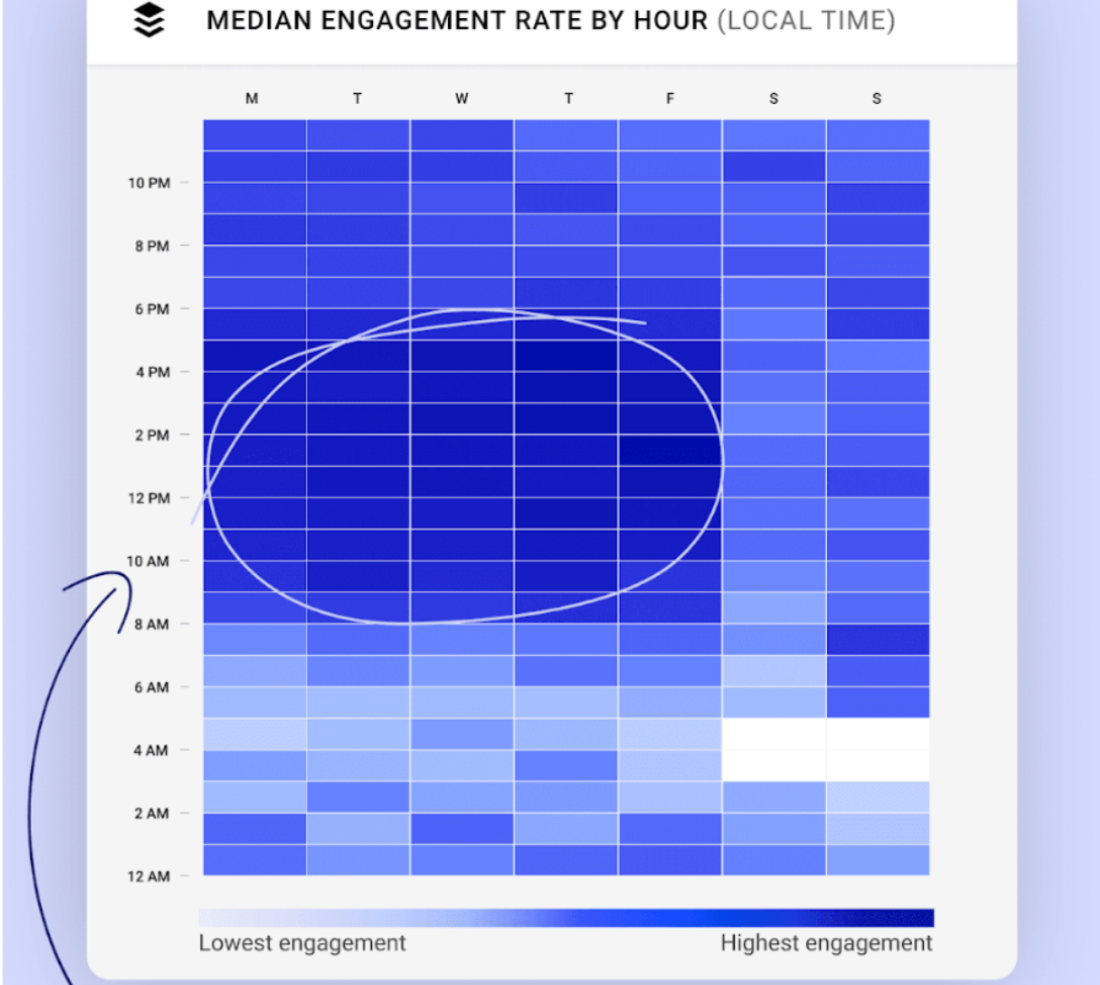
Figure 5
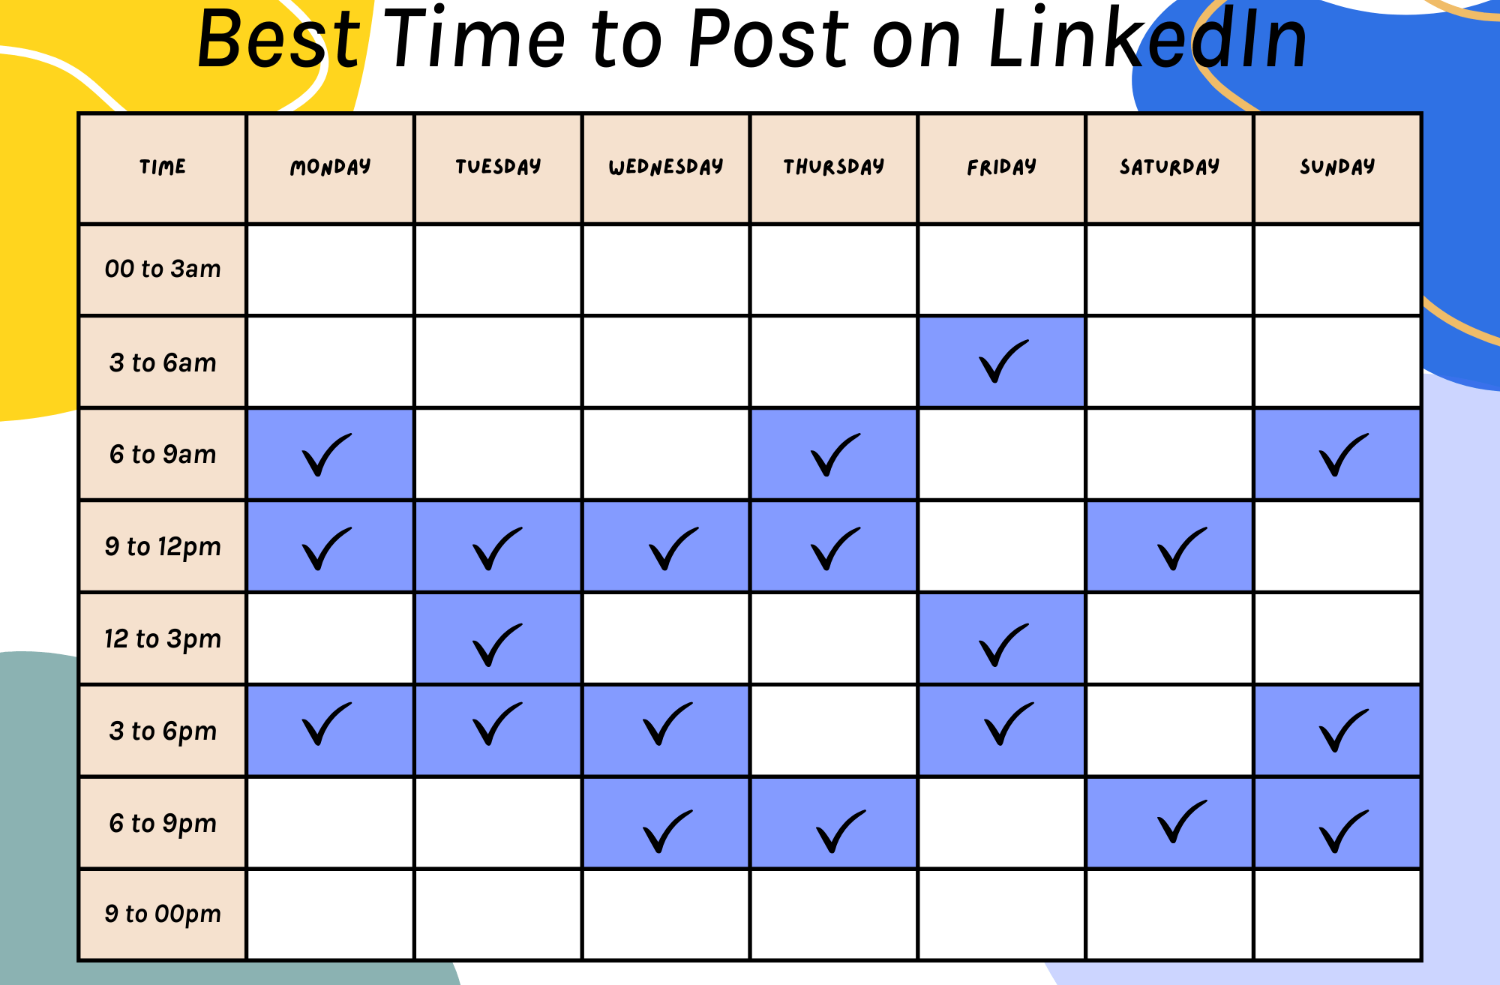
Figure 6
Before diving into the world of social media posting, I needed to sort out a few things regarding my personal brand for Instagram. This included deciding on the name for my account and choosing a logo or profile picture. Luckily, I already had a simple logo that I had created for my website portfolio back in my first year. While it may not have been the fanciest logo since it was quite basic and only consisted of my initials, it served its purpose well, especially considering I'm not a graphic designer. Using my initials as my logo/profile picture made it much easier to decide on my Instagram username. It just made sense to keep things consistent and use my initials, along with adding my niche or area of interest at the end. This way, my online presence would be cohesive and easily recognizable to others. As I delved into the journey of posting my work on social media platforms, particularly Instagram, I encountered a persistent challenge: procrastination. Unlike LinkedIn, where I could ease into the process by reposting intriguing content from fellow users, Instagram presented a more daunting prospect. The prospect of starting from scratch, crafting my own posts, was intimidating. Even though I had some previous work from last semester that I could have posted, I still found myself hesitating to make that initial post. Sharing my creations online felt like a significant leap, especially considering I'm not the type of person who typically shares what I do. This fear held me back, to say the least, causing delays in my posting schedule by several weeks. One of the main reasons I found it scary to start posting was because I noticed that the work being shared by others seemed to be of much higher quality than what I was producing. This made me worry that my work wouldn't measure up and that people would judge it harshly. This fear of not meeting the standards set by others made it difficult for me to take that initial step into sharing my work with the world.
Once I got past the first hurdle of procrastination, I finally began posting my work on social media, even though it was a few weeks later than planned. It was a step in the right direction. However, sticking to the scheduled posting times I had planned became tricky. After the first few posts, my outside work commitments took over, throwing my planned schedule out the window. I ended up forgetting about the schedule altogether and just started posting whenever I had the chance. It was a bit of a surprise to find that deviating from my planned posting schedule actually had some advantages. I noticed that the posts I shared off-schedule seemed to do a tad better compared to the ones I posted according to my initial plan. However, despite this small win, maintaining my motivation to consistently share my work became increasingly difficult as the project progressed. The minimal engagement I was receiving on my posts made it hard to keep pushing forward. It felt like I was putting in a lot of effort without seeing much in return. This lack of interaction and feedback started to take its toll on my enthusiasm and drive to keep creating and sharing. Consequently, my productivity levels took a hit, and there were times when I didn't produce any new work for a week or two. It became a bit of a cycle - low engagement led to decreased motivation, which in turn resulted in even fewer posts being shared.
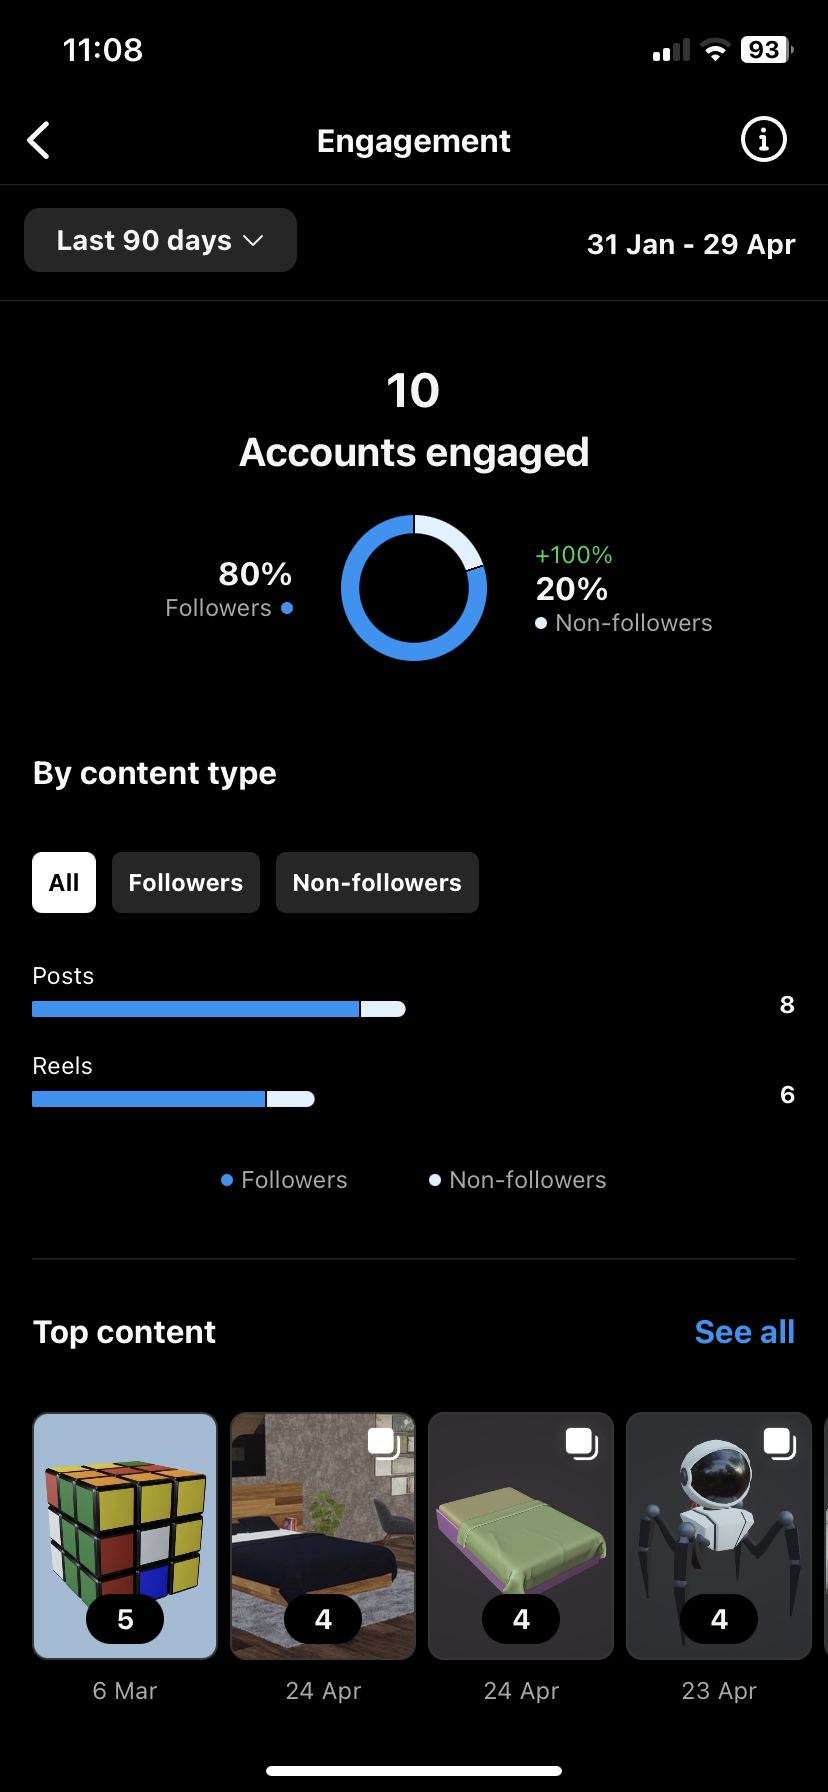
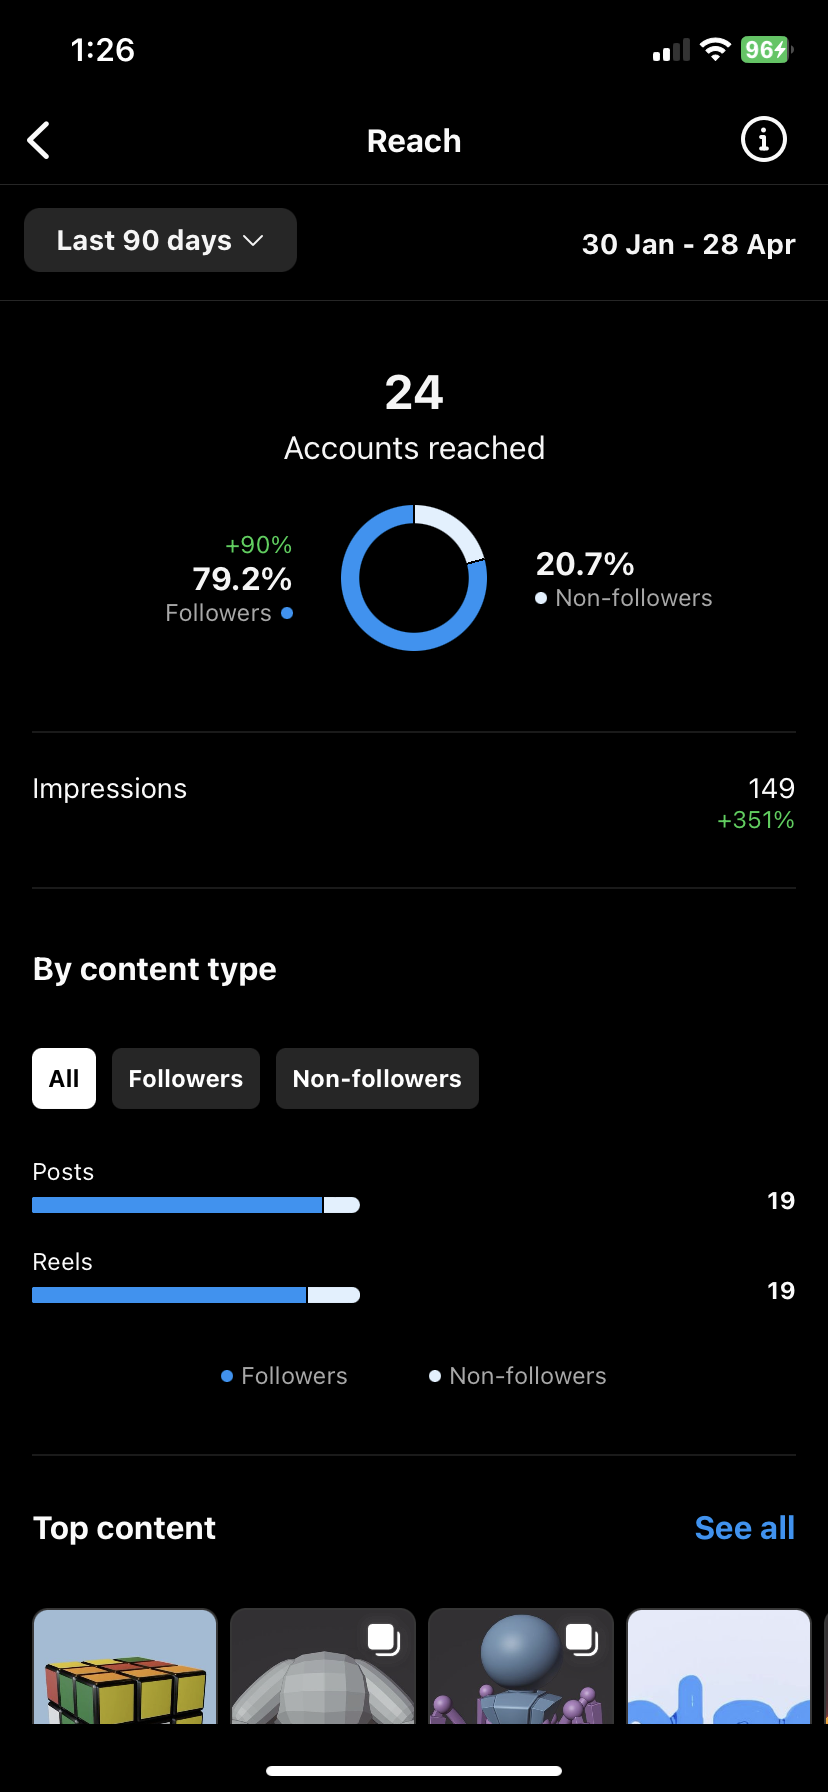
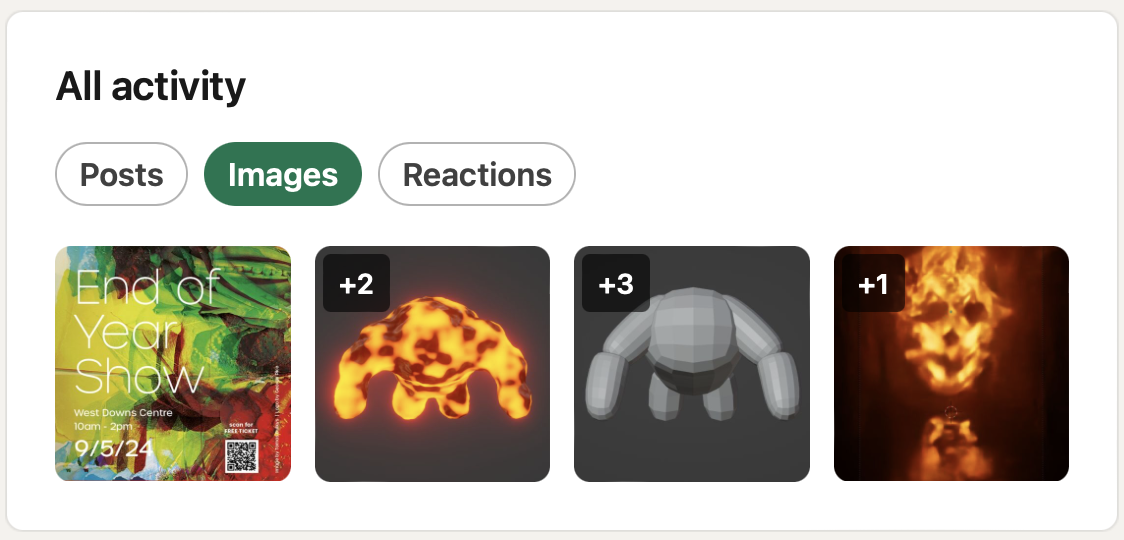
Figures 7 and 8 shows the results of my post that was aligned to a scheduled time, whereas Figures 9 and 10 show the results of a post that was posted at a random time of day. At first glance, one might assume that the random post performed better because it was an IG reel. However, this isn't the case, as I had previously posted another reel on my page that didn't perform as well as some of my scheduled posts. In Figure 11, you'll notice that there are two posts that performed a bit better, reaching 17 and 18 accounts respectively, compared to the 16 that my other reel got. These posts were part of my scheduled posting plan.
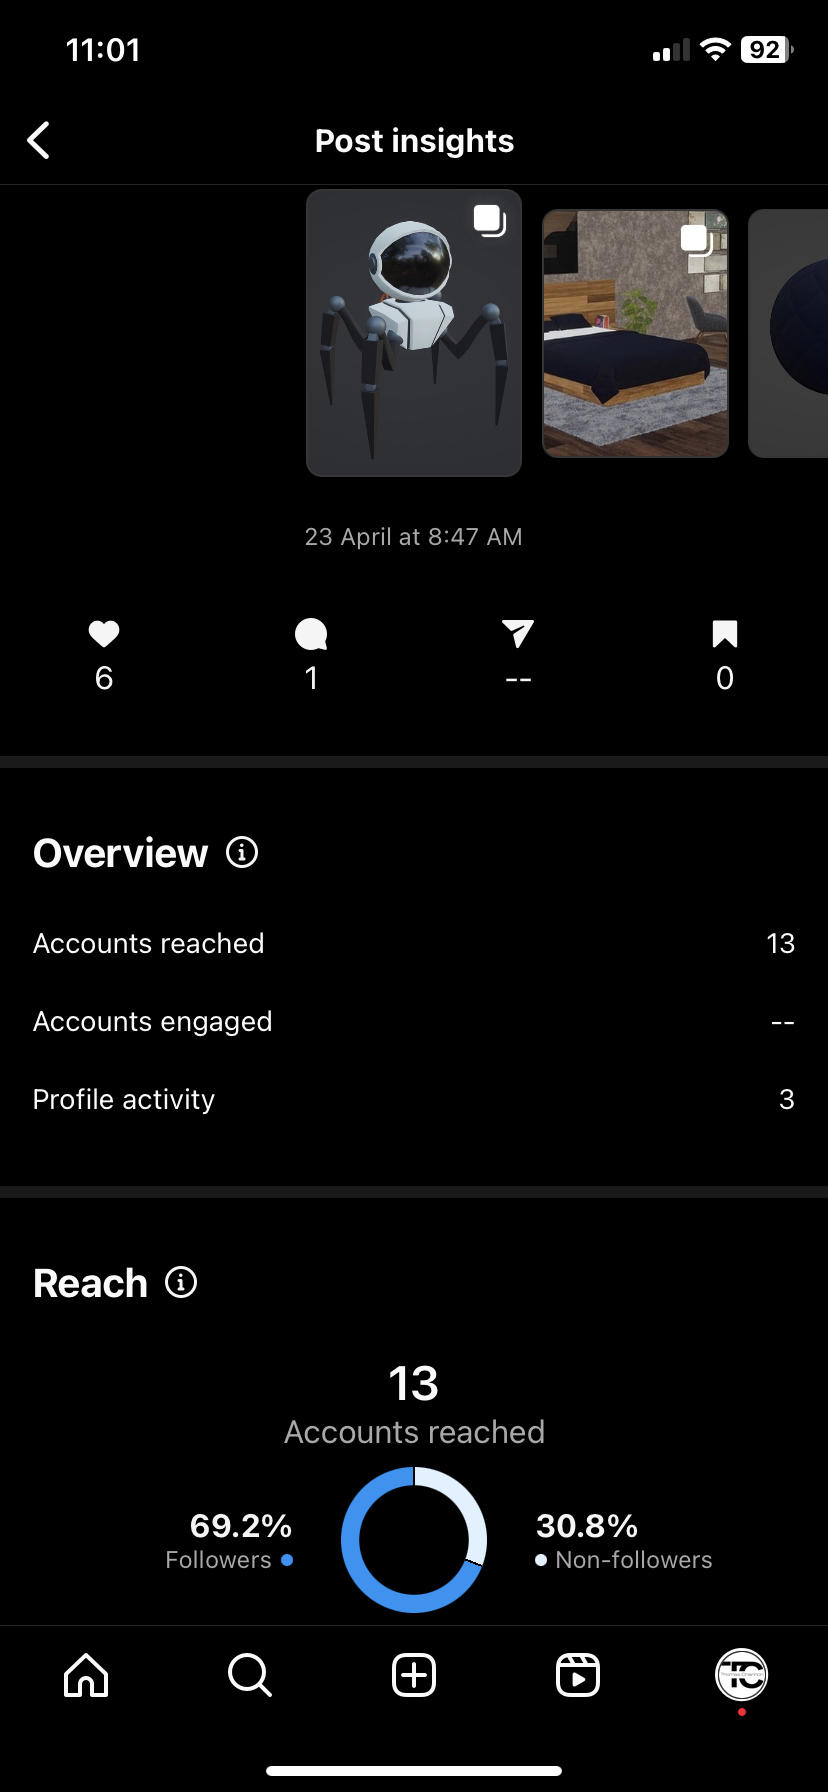
Figure 7
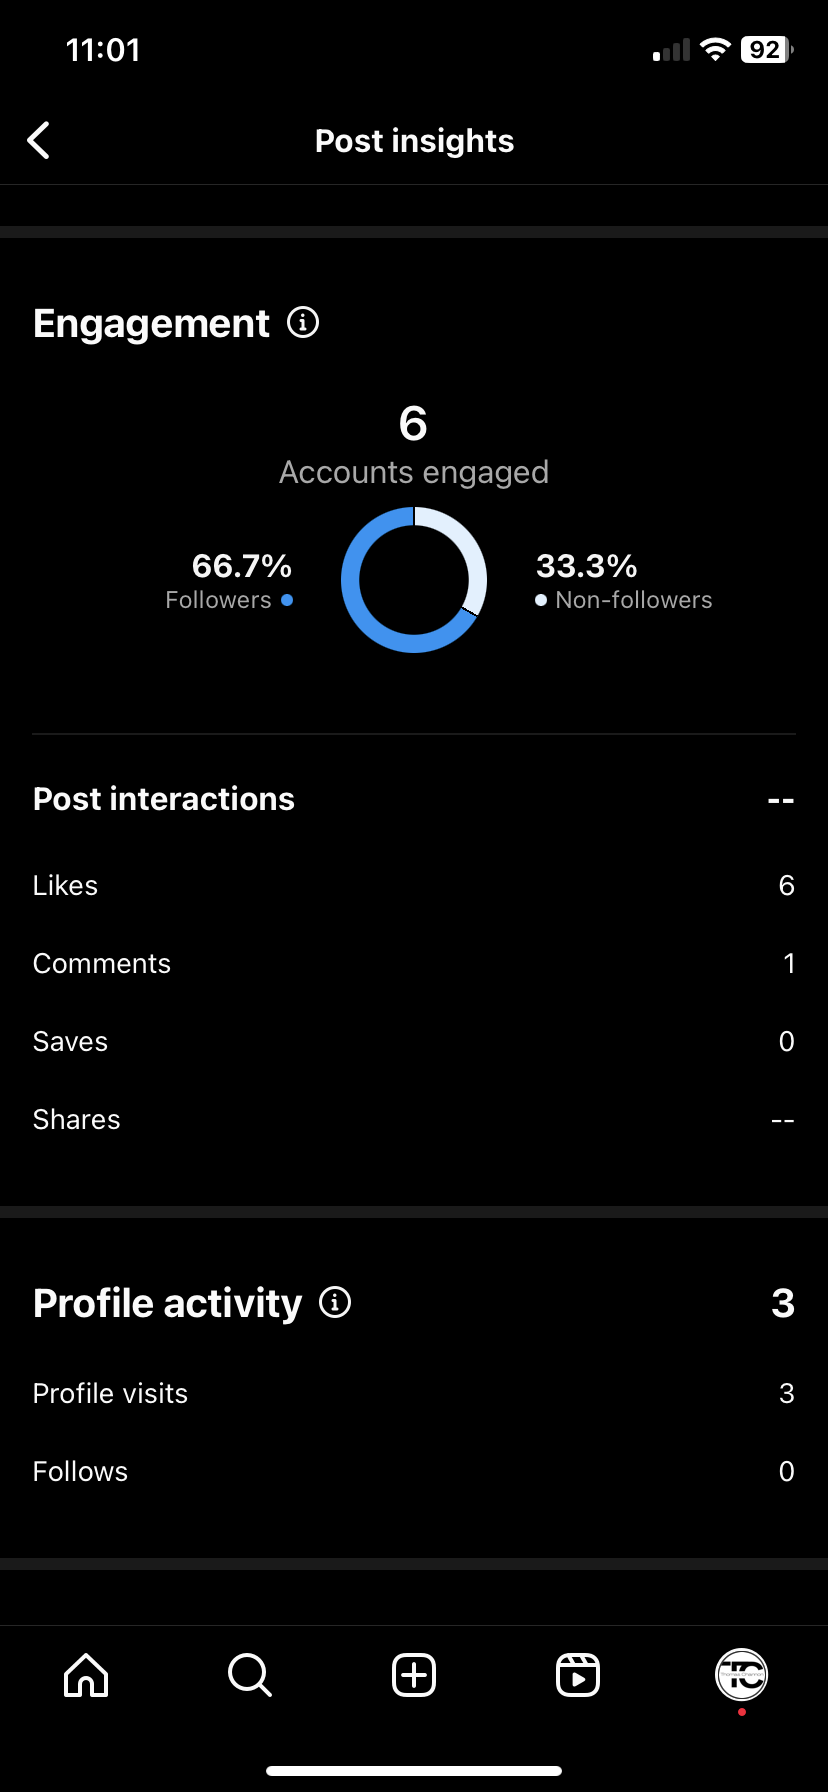
Figure 8
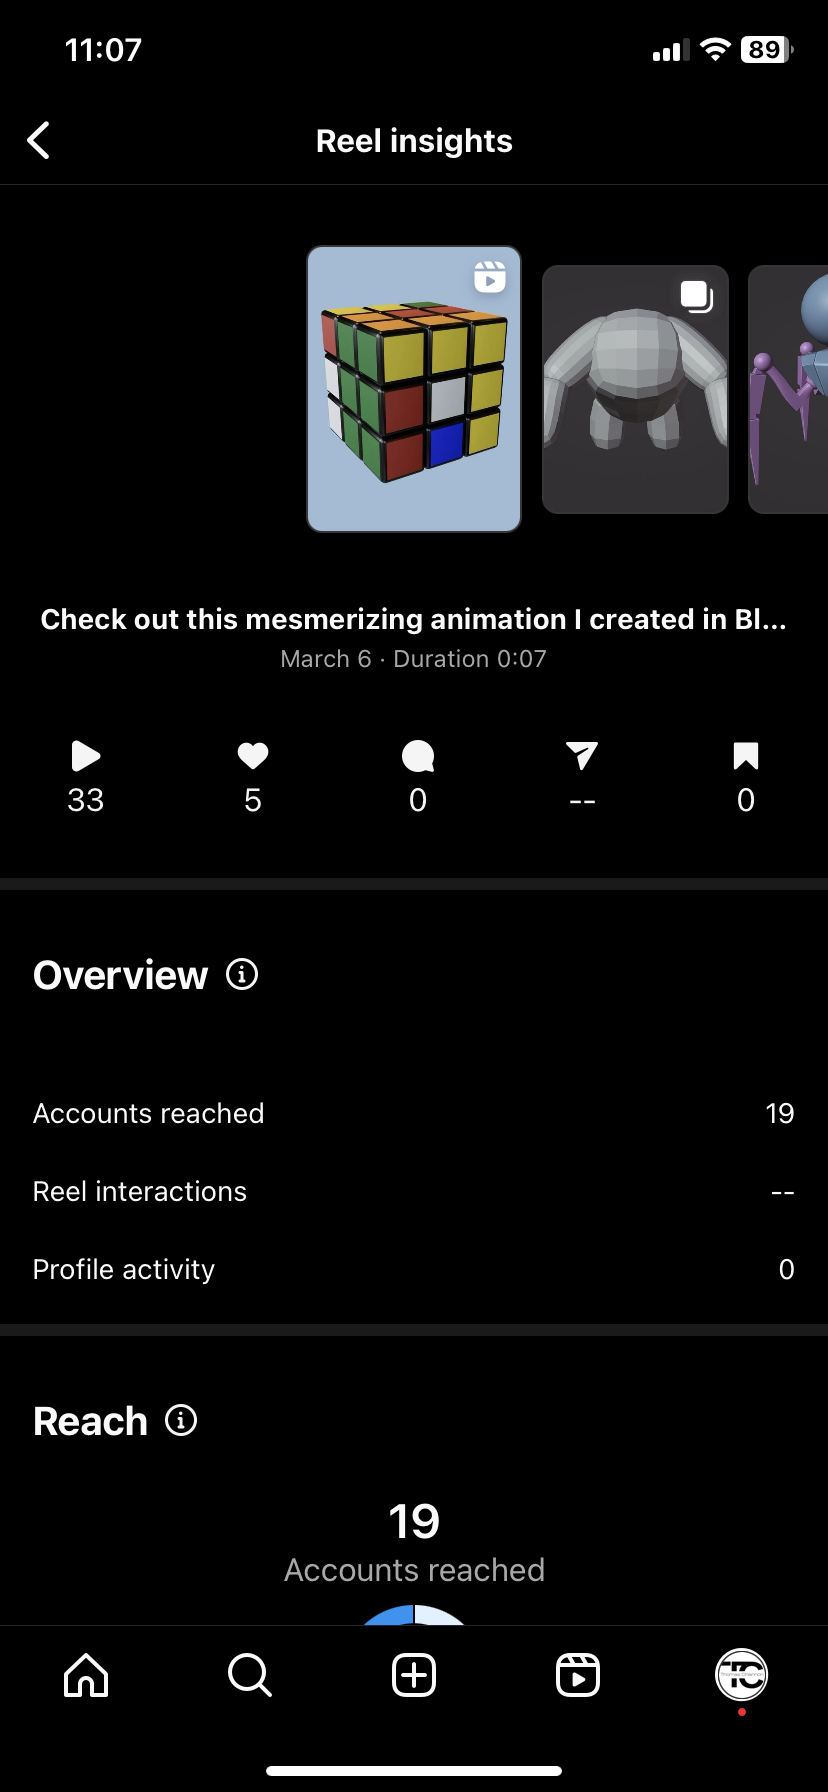
Figure 9

Figure 10
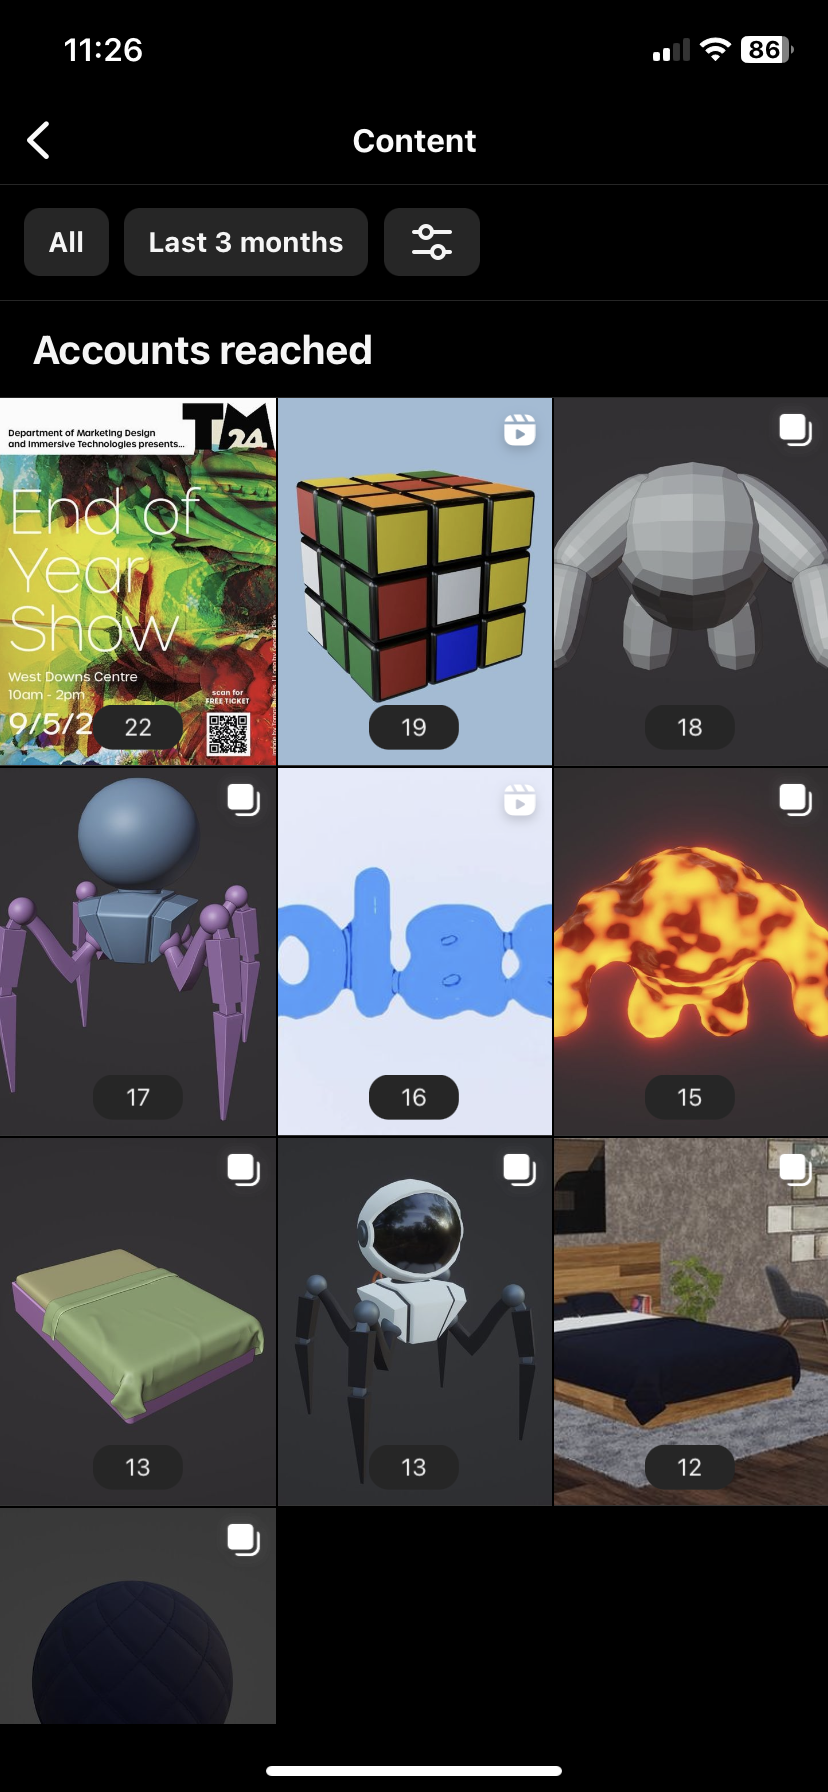
Figure 11
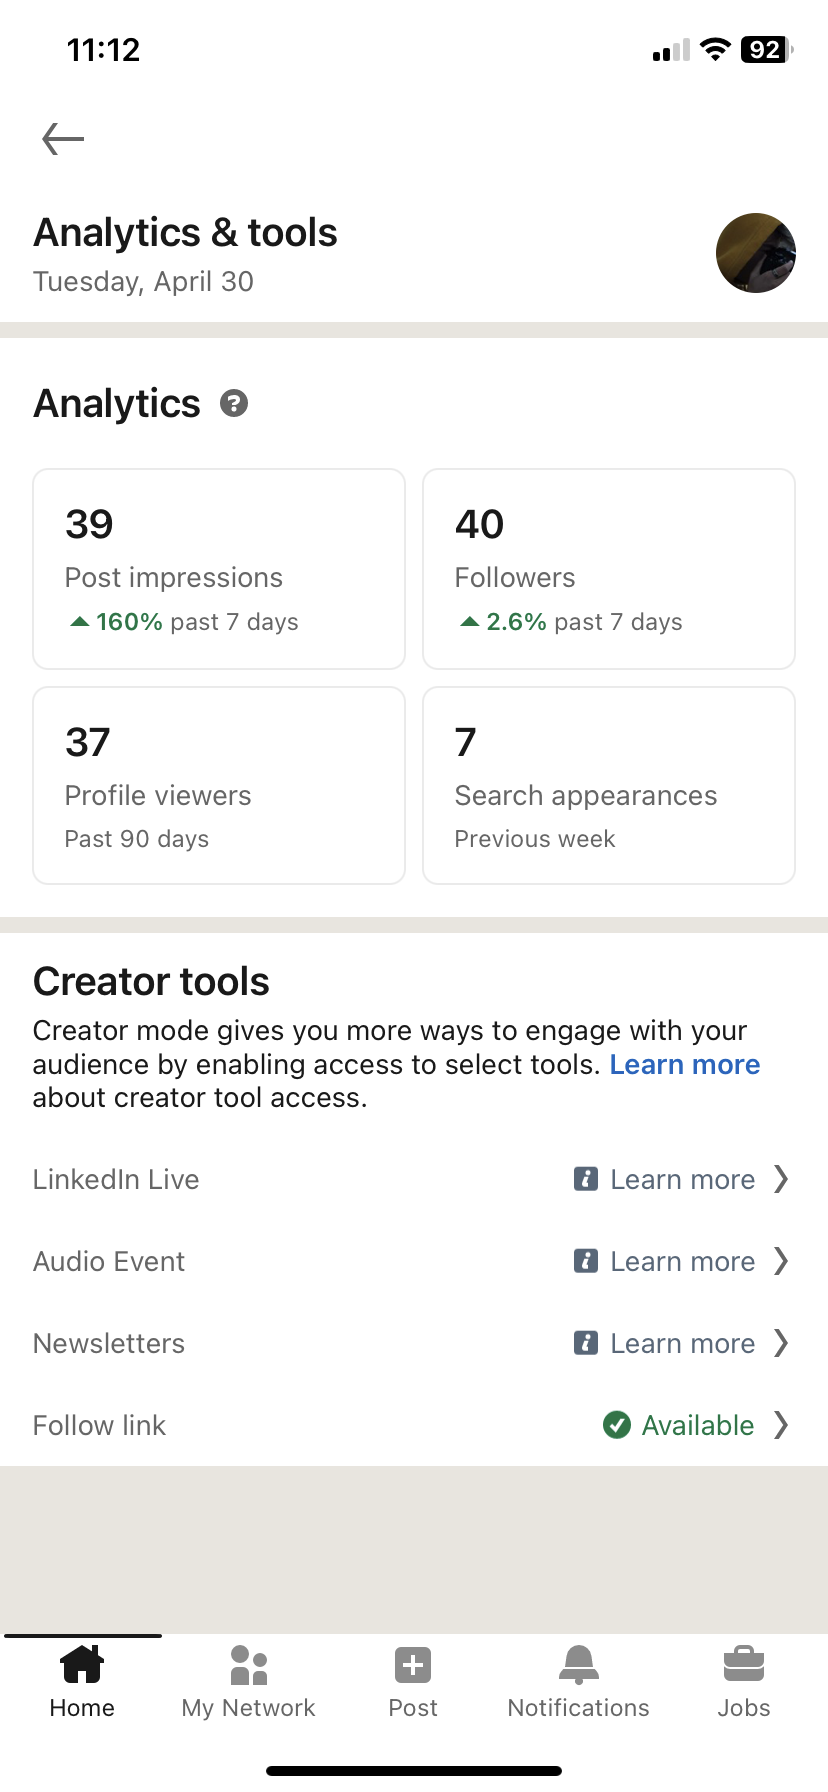
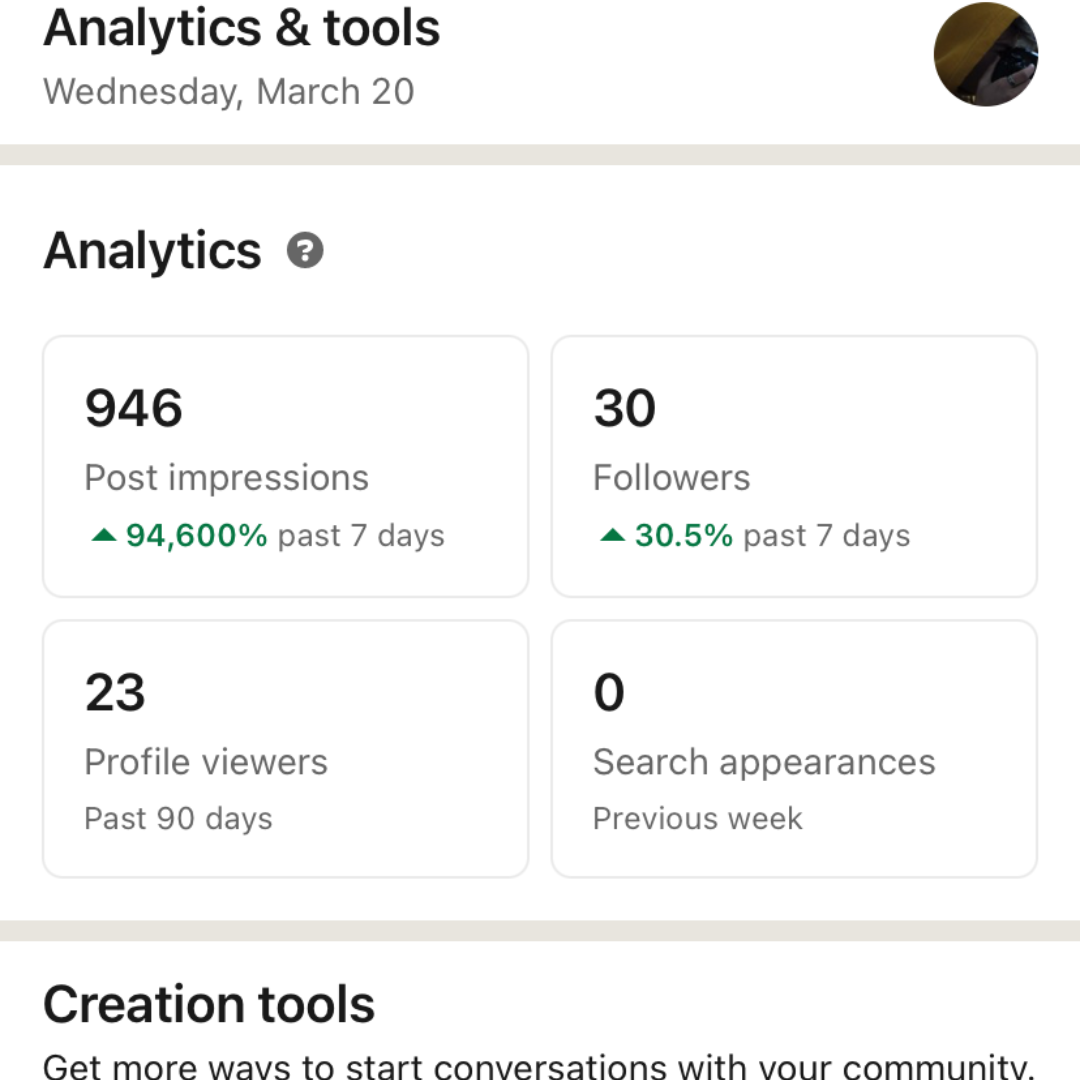
Despite the challenges, there was a silver lining that appeared around the time I began sharing on LinkedIn. I remember checking my post engagement and impressions, and to my amazement, I saw a staggering increase of 94,600% in just seven days! It was unbelievable. This unexpected boost in engagement gave me a much-needed confidence boost and motivated me to share and repost more content on LinkedIn. It was like a small victory that encouraged me to keep going and put more effort into my social media presence. As I reflect on the culmination of this project, I can proudly say that despite the hurdles I faced, I managed to achieve a notable milestone. By the project's conclusion, my efforts resulted in the creation of 10 Instagram posts, and 4 original pieces of my work with 14 reposts of others' creations on LinkedIn. It's important to note that my original goal was to achieve a target of approximately 25 posts on Instagram, along with a total of 6 posts on LinkedIn, including reposts. Considering the challenges I encountered, such as struggling with motivation and productivity, I believe I fared reasonably well. However, there's a remaining curiosity about whether my outcomes would have differed had I reached the intended 25-post mark on Instagram. It's a question without a definitive answer, yet it prompts reflection on the potential impact of meeting or exceeding predetermined targets. In hindsight, I acknowledge that a key lesson learned from this experience is the significance of consistent posting, especially on platforms like Instagram, where frequency can positively influence engagement algorithms. Despite the initial slow progress and the nervousness of facing potential criticism, I realize now that persevering and sharing my work openly is paramount. If I were to embark on a similar project in the future, I would undoubtedly strive to surpass the initial target of 25 Instagram posts. Armed with the understanding that progress may start off gradually, I would approach the endeavour with a renewed determination to share my work, undeterred by the fear of judgment or initial low engagement levels.
This project was deemed essential primarily because of the manifold benefits associated with social media platforms, particularly in terms of networking. Networking served as the cornerstone of this project, offering us a pathway to connect with potential opportunities relevant to our respective niches. It's like building connections with individuals who possess valuable insights and experiences that can aid in our professional growth and development. Another great thing about networking through social media is that it helps spread the word about events to a wider audience. Instead of only people in the local area knowing about events, now more people from different places can find out about them. This means more people can learn about industries they may not have heard of before. For example, there's a conference I'm planning to attend later this year. I wouldn't have known about it if a classmate hadn't told me about it and they probably wouldn't have known about it either if it wasn't advertised somewhere online. This connection to Sustainable Development Goal 17, which focuses on partnerships for achieving goals, is crucial. One of the targets in this goal is to promote knowledge sharing and cooperation for access to science, technology, and innovation. By using social media to network and share information about events and opportunities, we're contributing to this goal by helping people access knowledge and connect with others who can help them succeed.
Here is the link to the conference if you like to know more about it. https://www.developconference.com
In this module, I'll be diving into a group client project that spans over 12 weeks. This project is based on real-world scenarios and aims to introduce students, like me, to the principles and challenges of our chosen area of specialization as outlined in the program. During this time, I'll have the opportunity to collaborate with an industry professional or client, gaining valuable insights into the specific considerations of our specialized field. Alternatively, I can work with fellow students to bring our initial project ideas to life, potentially creating a working prototype. For my client project, I'll be continuing my collaboration with Rob from RaRa Games on a game called Tomebound. This is the same project I worked on last semester for my group client project, where I created a shield asset and decorative pillars for the game which stand in the corners of each floor. This time around, I had to decide which aspect of Tomebound I wanted to focus on for the next 12 weeks. While there were many tempting parts of the game to work on, such as the opening cinematic scene or creating new enemy characters, I ultimately chose to work on the boss fight for the final floor of this section of the game as I believe that it'll give me the most experience seeing that I have never modelled anything needed for this type of scenario before. Starting out in our small group of four for the boss fight, Jacob, and I, both 3D students, had to decide on our respective roles. After discussing our preferences, I learned that Jacob wanted to focus more on the animation side of things, which suited me just fine as I was eager to take on the challenge of modelling a character, as I hadn't tried my hand at it before. For the remaining task of the boss fight, Shaz and Joel took charge as they are the game developers in our group and they are the most familiar with using unity, the game engine that Tomebound is built in. When it came to modelling the character, I felt a bit lost because it was my first time attempting something like this. I didn't know where to begin, so I ended up procrastinating a bit and focusing on other work instead (not related to this project). This delay pushed back the start of the modelling process by a few weeks. After my brief period of procrastination, I finally got started on the project. The first thing I did was some research and looked at what others had done to get an idea of how to begin. With some inspiration in hand, I was finally able to start the modelling process.
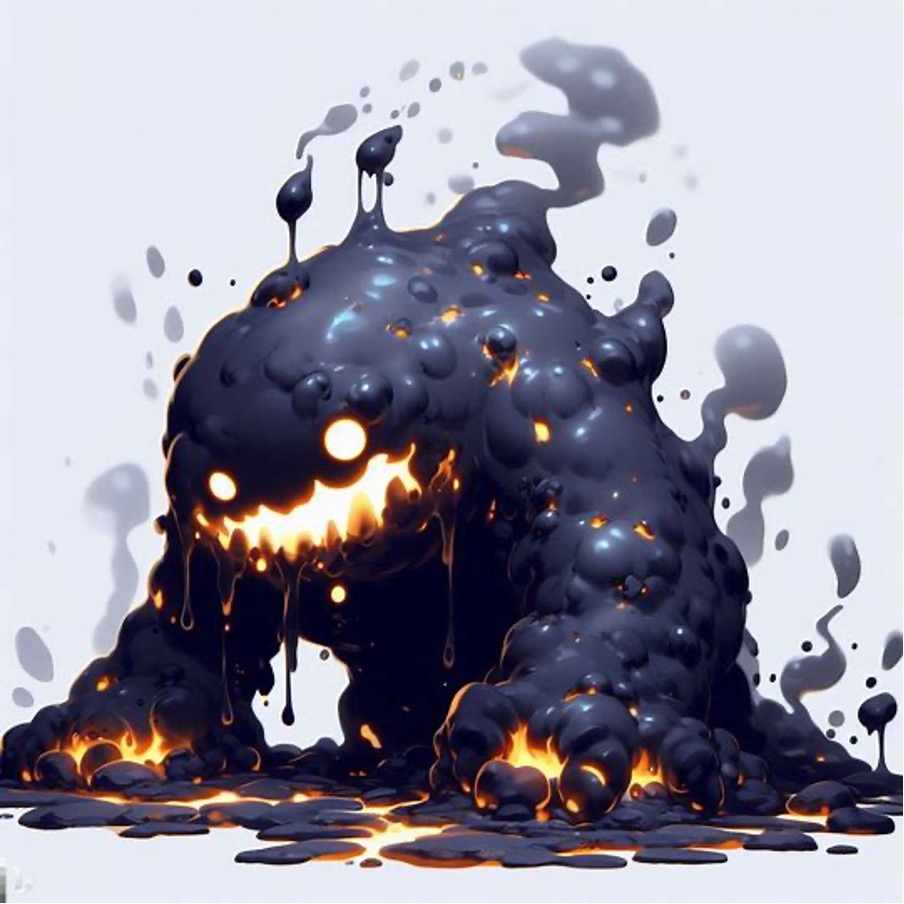

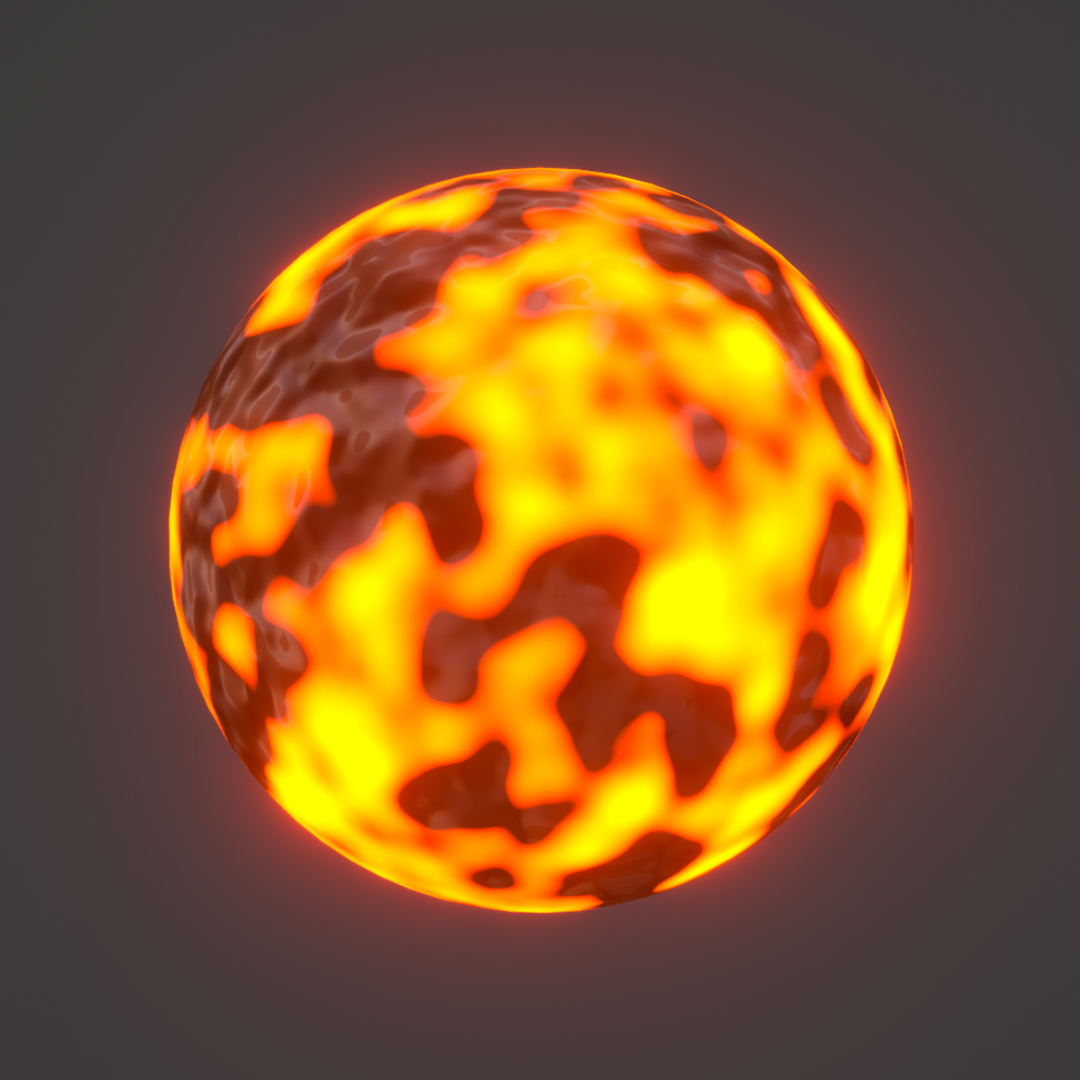
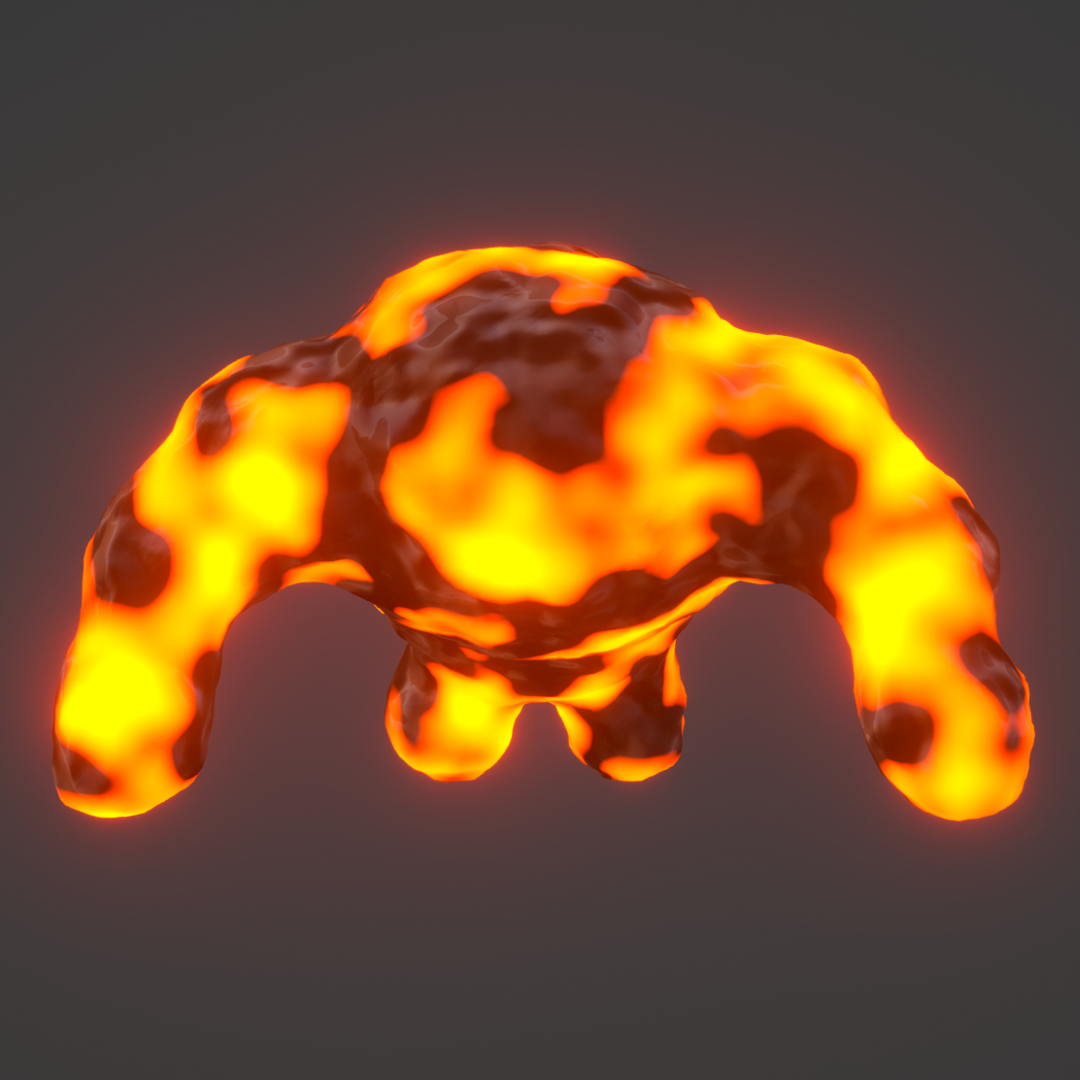
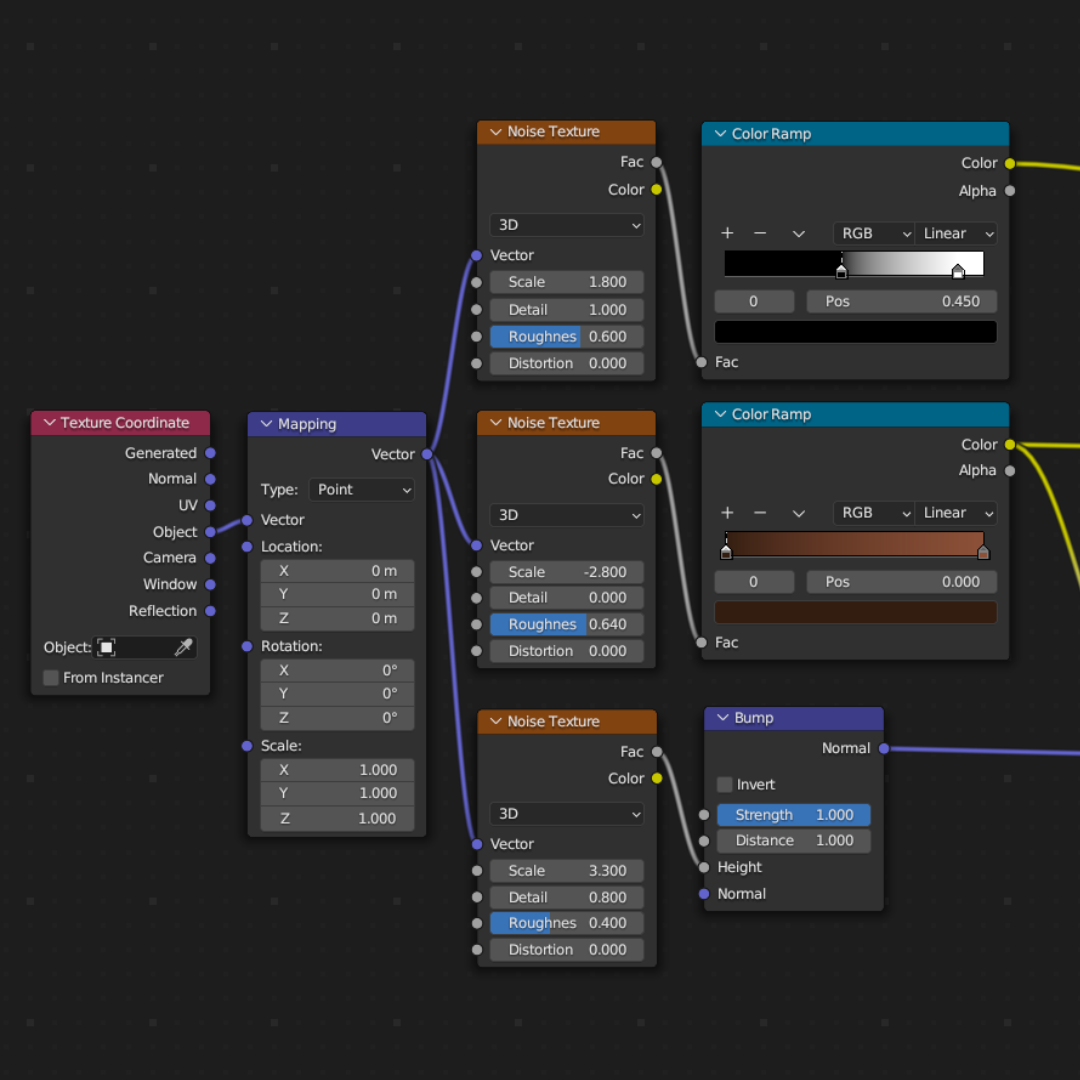
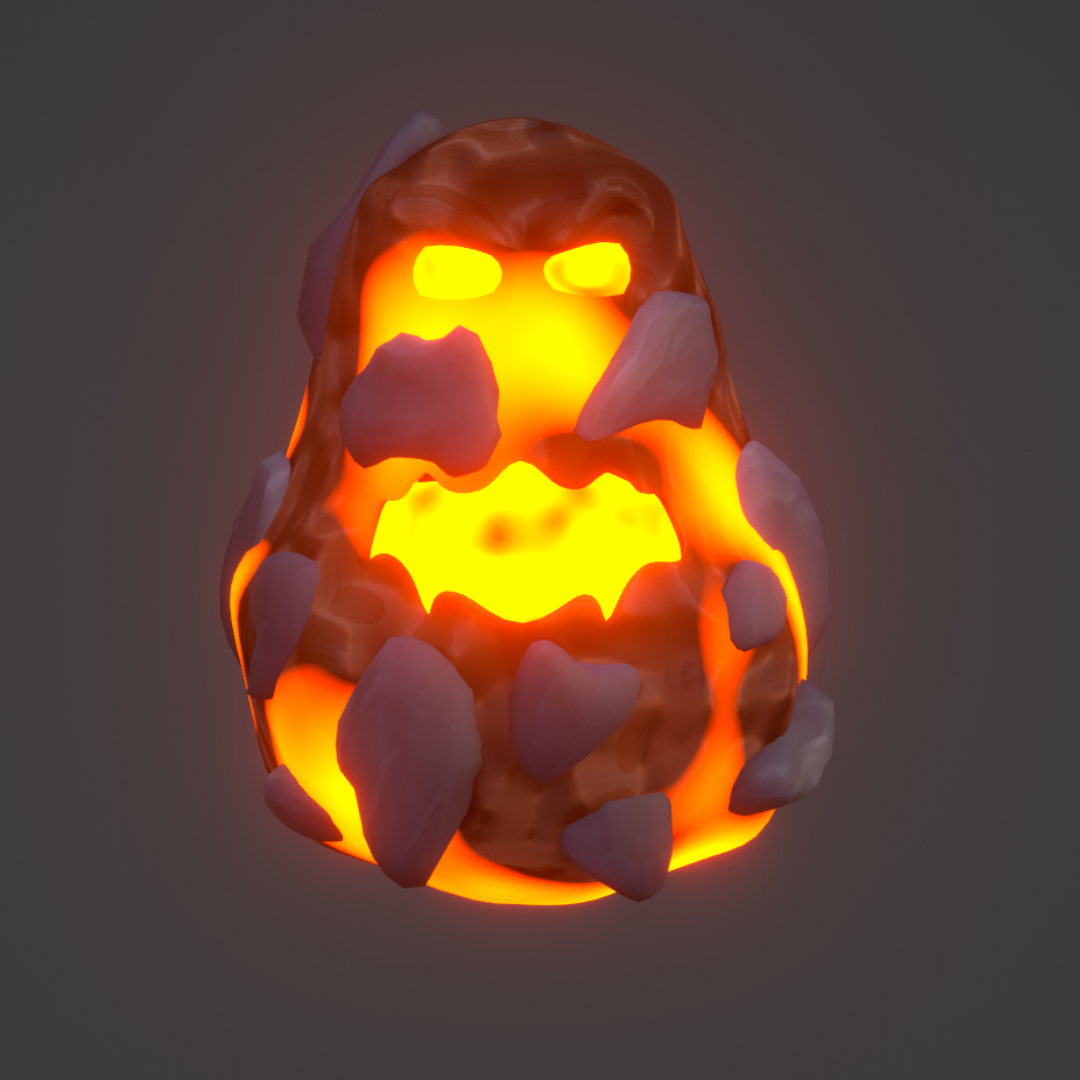
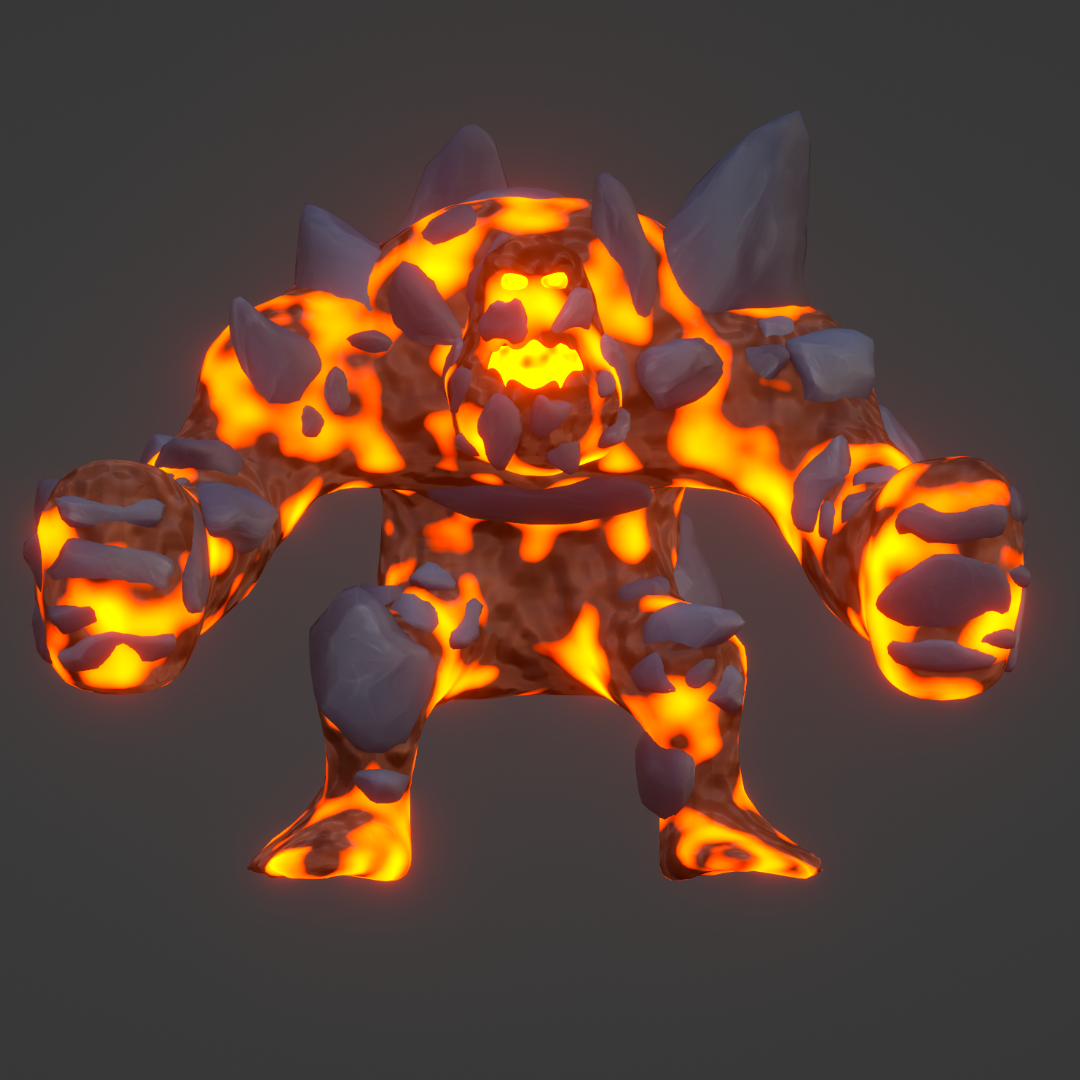
Once I had reached a stage with the boss character that I was satisfied with, I felt it was time to create a rocky lava texture/material for it. To accomplish this, I turned to a free tutorial I found on YouTube. The tutorial guided me through the process, which involved using a combination of noise texture nodes, colour ramps, and bump nodes to achieve the appearance of rocky lava. Additionally, the tutorial introduced the use of an emissions shader, which not only provided the lava with its colour but also allowed it to emit a glow. The noise texture nodes play a crucial role in creating the material's texture. They function by evaluating a fractal Perlin noise at the input texture coordinates. These nodes can be used for a single Perlin noise evaluation or for combining multiple layers with increasingly finer detail, which is how I've utilized them in the material. The noise texture nodes are responsible for generating the rocky sections throughout the material. By combining the noise textures with a colour ramp node, I'm able to control the prominence of either the rock or lava elements in the material. The colour ramp node is used for mapping values to colours using a gradient. So, if I want more rock and less lava, I simply adjust the slider on the black side of the colour ramp, which increases the appearance of the rock texture.
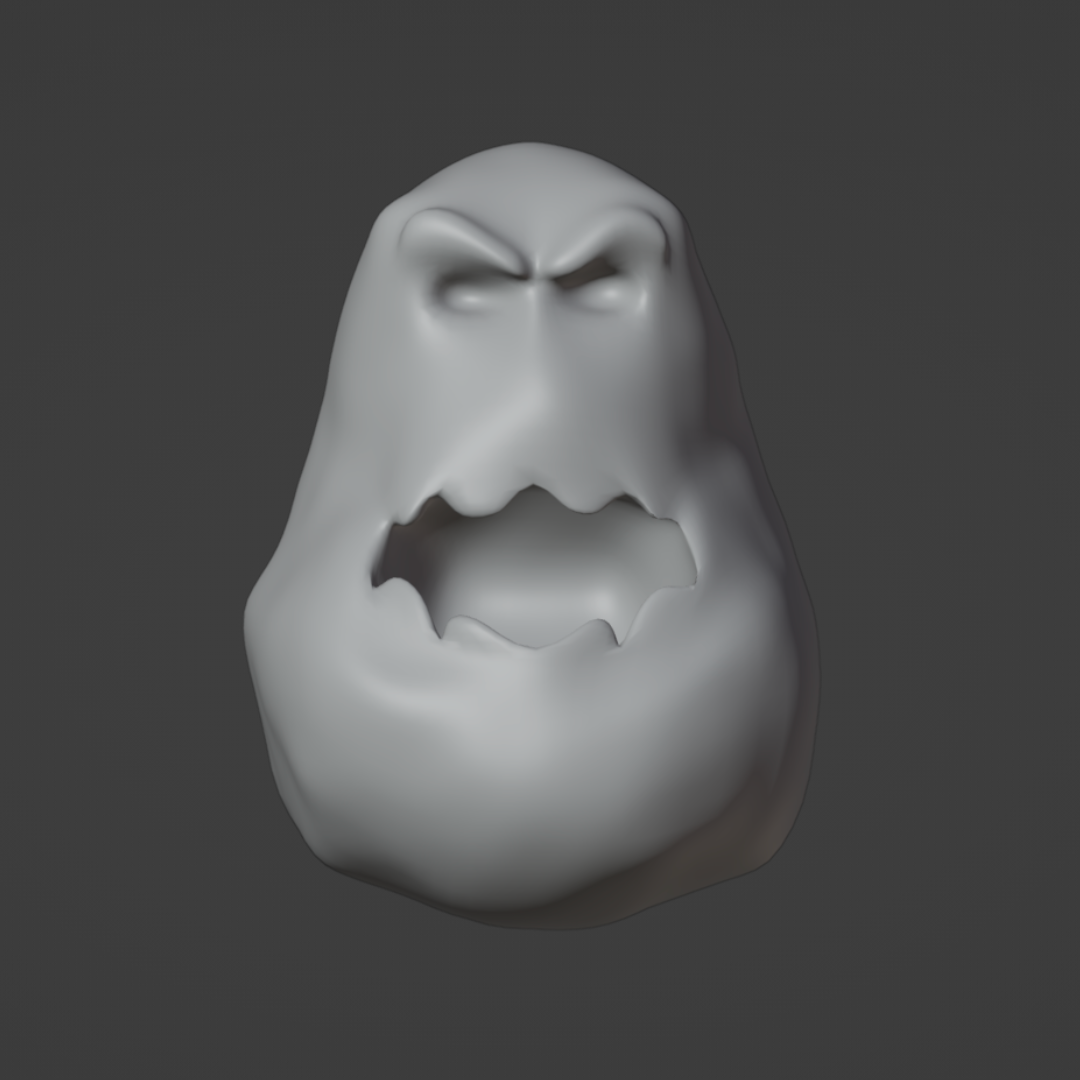
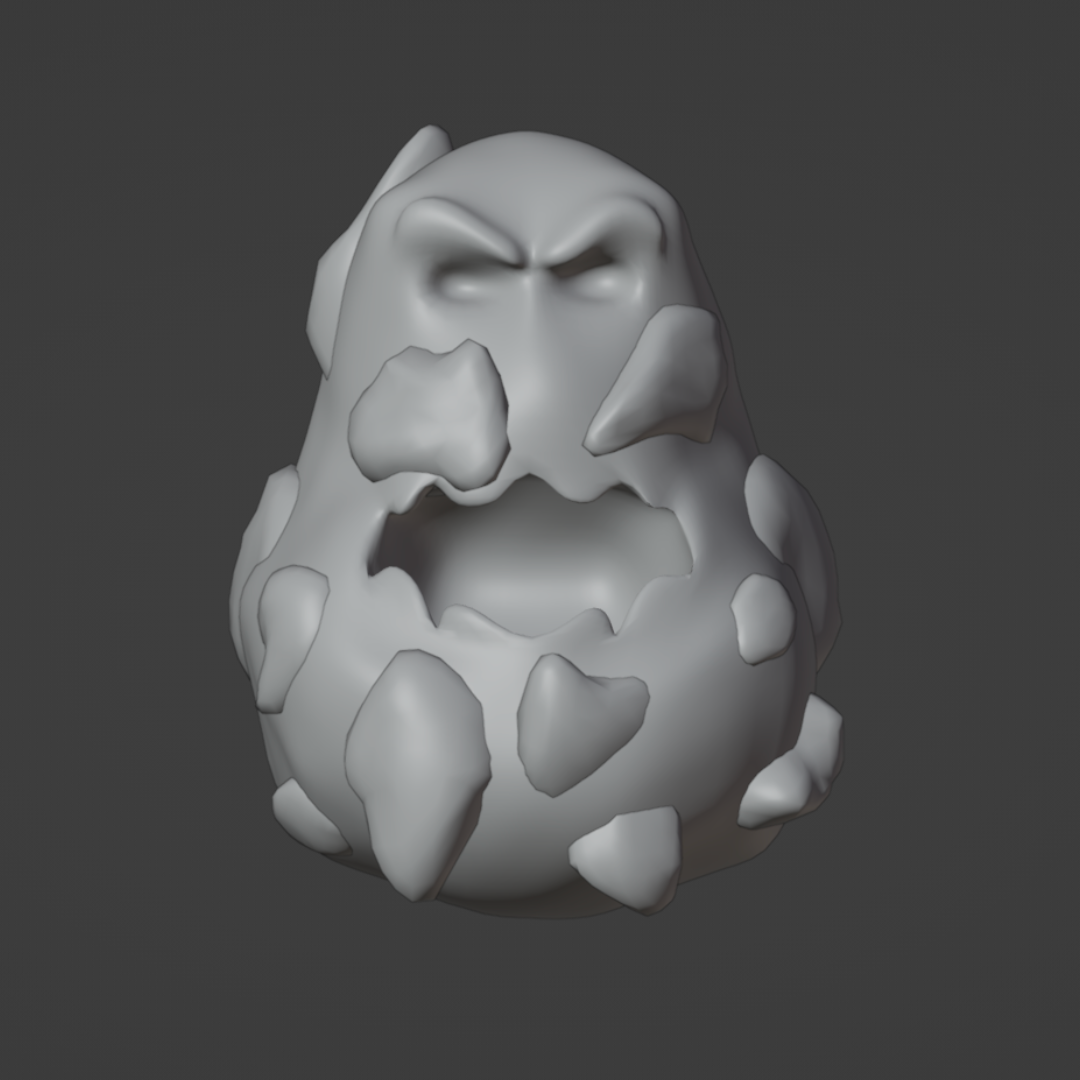
With the texture / material completed, it was time to focus on creating the head of the character. I sat down with Rob to discuss how he envisioned the head looking. After some brainstorming, we agreed that the ice golem from Frozen was a good reference for what Rob had in mind. With that inspiration in mind, I imported an image of the ice golem into Blender to use as a guide while modelling. To start modelling, I began by adding a standard cube into Blender. Then, I applied a subdivision surface modifier to the cube and enabled the "on cage" option. This allowed me to manipulate the vertices of the actual model instead of just the cage, which gave me finer control over adjustments, and after adding in some loop cuts and extruding a few faces, I had a rough block out of the head. During the modelling process of the head, one helpful trick I learned was setting a 5 minute timer before making adjustments to a specific area of the model. For example, when I started moving individual vertices around to refine the rough block out, I'd give myself 5 minutes to work on one section of the face. Once the timer went off, I'd stop and move on to another part of the model. This little trick made a big difference for me, especially because I tend to be a perfectionist. I wanted everything to look perfectly symmetrical on both sides of the face. However, in character modelling, not everything should be perfectly symmetrical. Some asymmetry is necessary to make the character look more natural and lifelike.
Once I had perfected the shape of the head using the 5 minute trick, including refining the mouth area that I initially created in the rough block-out stage, it was time to add more facial features. This involved creating eye sockets, adding more detail around the mouth, defining eyebrows, and crafting a slight nose. To achieve this, I simply extended more faces and adjusted some vertices to achieve the desired facial structure. For the mouth, I extruded individual faces to form lips / teeth. Crafting the eye sockets involved extruding a couple of faces inward to create a concave appearance. For the eyebrows, I extruded groups of faces to give them a solid look and adjusted some vertices to create an angry expression as per Rob's request. Lastly, for the nose, I simply adjusted a few vertices to form the bridge of the nose, similar to Voldemort's nose but without any holes. It might seem a bit strange that I modelled the head separately from the body, but there's a good reason behind it, especially considering how some of the game mechanics were going to work. In the boss fight, there are going to be three phases. The first two phases don't really matter for this explanation because the separate head isn't relevant to them. It's in the third phase of the fight where the reason for modelling the head separately becomes apparent. During phase three, the boss is going to attempt to hit the ground or the player with its fists. The player will have to move objects in front of the boss at the point on the floor where he's going to hit. This will result in the boss losing the arm he hit with because he's made of rocky lava. This will make him increasingly angry, leading to a second arm being lost in the same way. Now, here's where the separately modelled head comes into play. In the final part of phase three, the boss will be so angry that he'll use his head as a last attempt to try and hit the player. This will result in him smashing his head into bits, causing the boss character to die, and allowing them to pass through to the next section of the game.
Unfortunately, I can't show any earlier development stages before the image on the left, which is the final version of the head before I added in the rocks, as I forgot to document the process I went through.
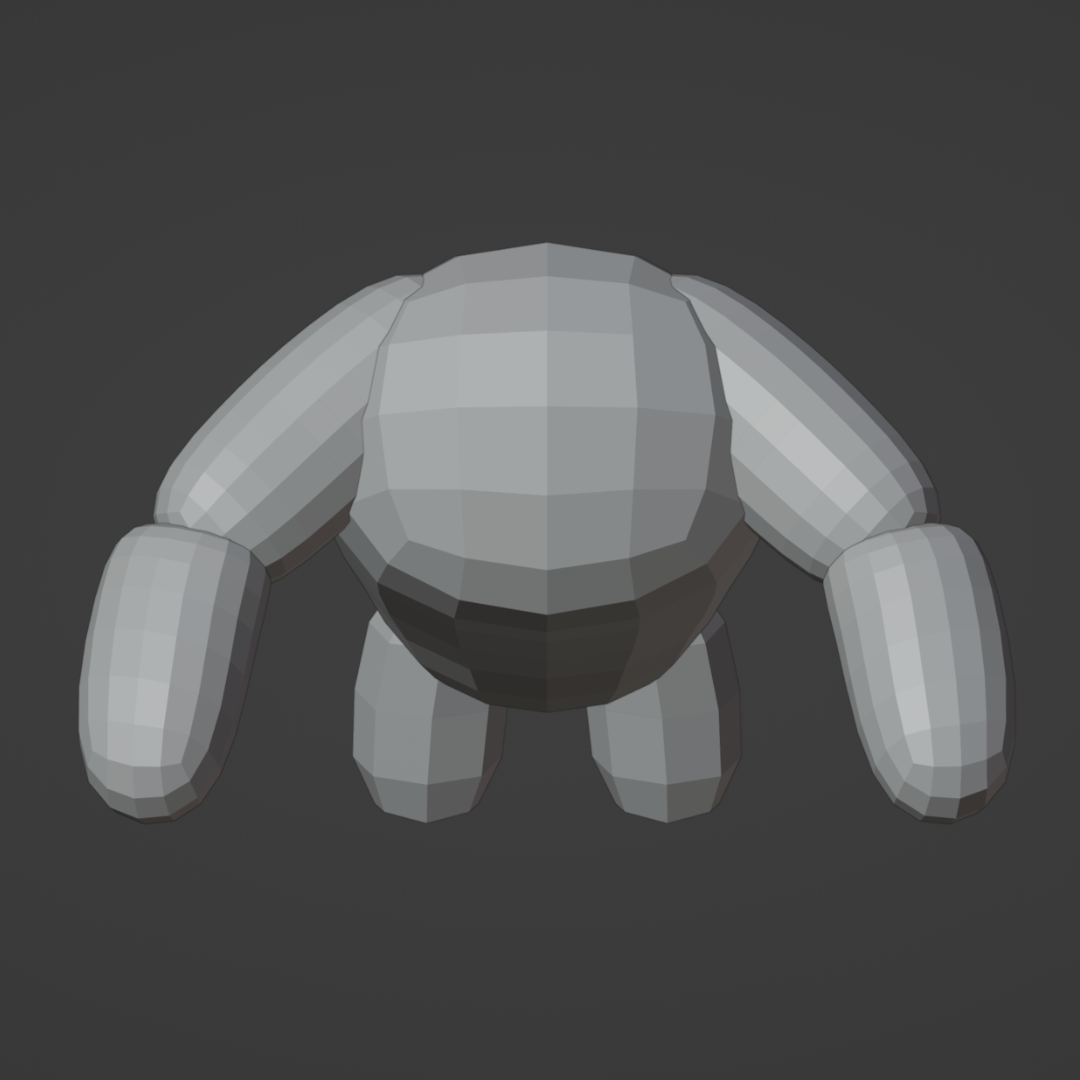
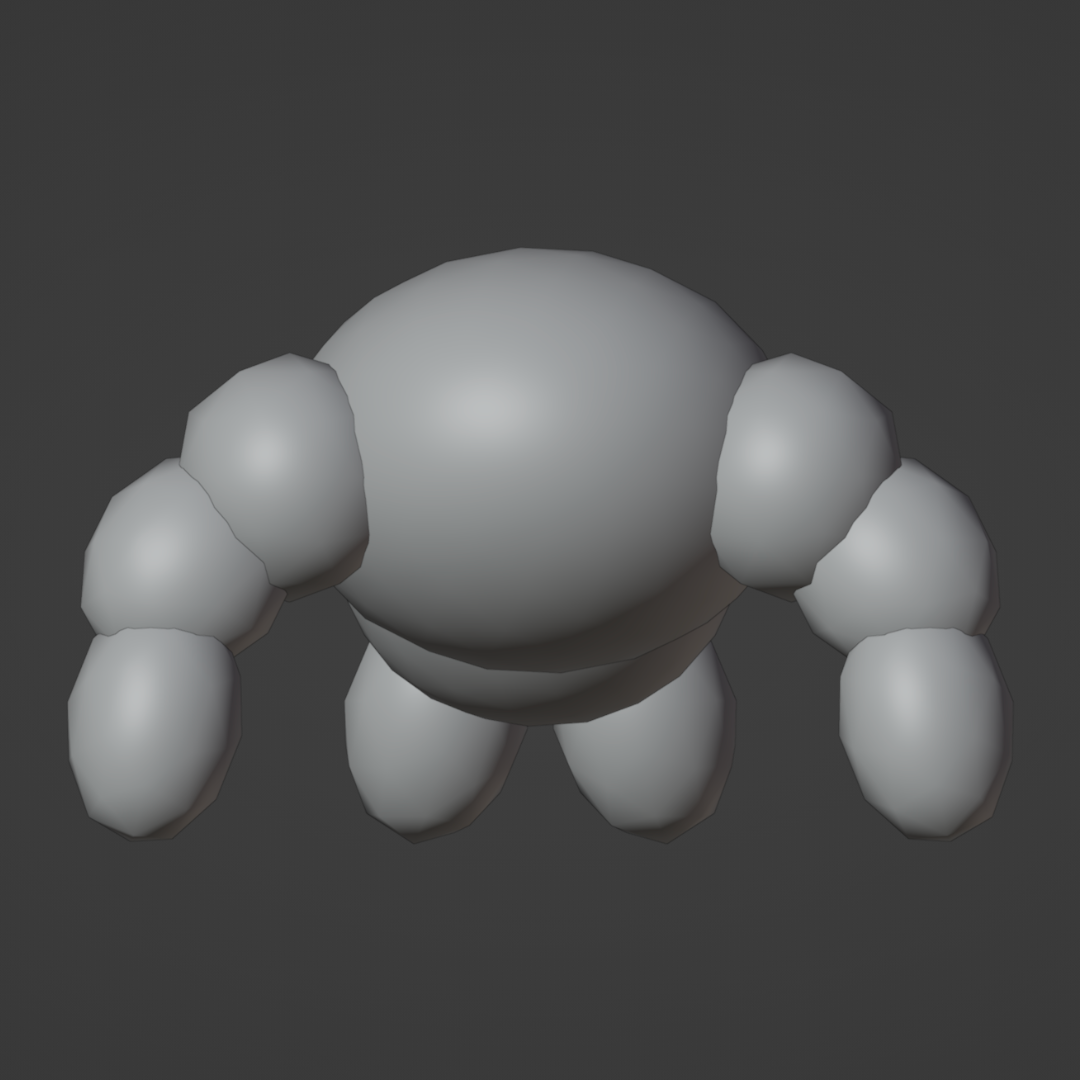
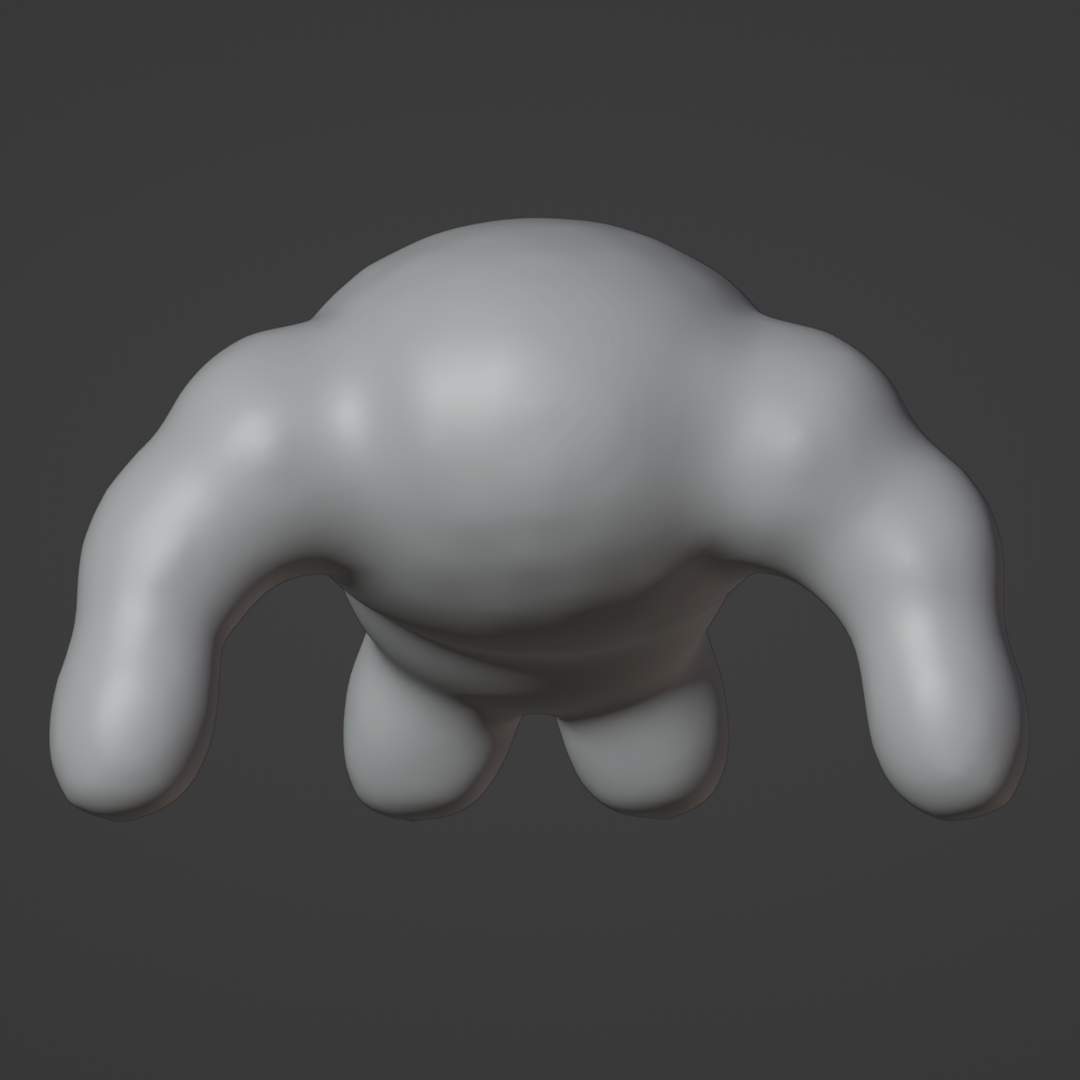
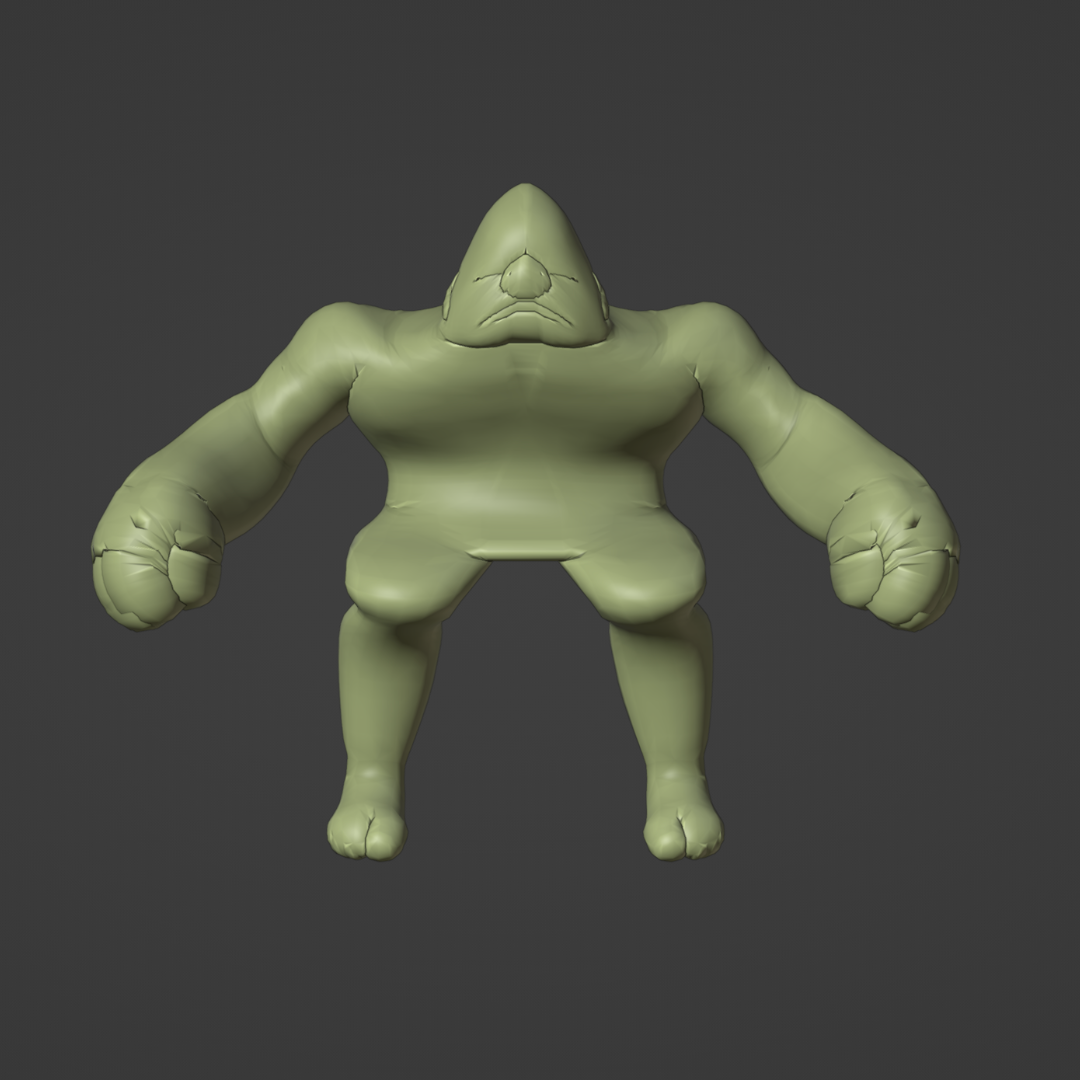
After the head was finished, it was time to see how it looked with the body, and it didn't look too bad. However, we realized that the proportions of the character's body were way off. When we put my original model into Jacob's animation, we noticed that it was mostly torso with disproportionately long arms and short legs. To fix this issue, we decided to start over with the body. Me, Rob, and Jacob worked together and imported a model of a relatively large-sized human into blender and adjusted certain areas. We made the fists and forearms larger, put the model into a slight squat pose, enlarged the top half of the back to make it appear like it had really big shoulders, and widened and lengthened the feet. Throughout this process, we made sure to keep the centre of mass of the model as close to the middle of the character as possible so then it wasn't to front or back heavy. After creating this rough template, we began blocking out the shape of the model with ico spheres, following the silhouette of the template. This allowed us to take the model into sculpt mode to re-mesh it. Remeshing rebuilds the geometry of the model with a more uniform topology, giving us better control over the details of the model.
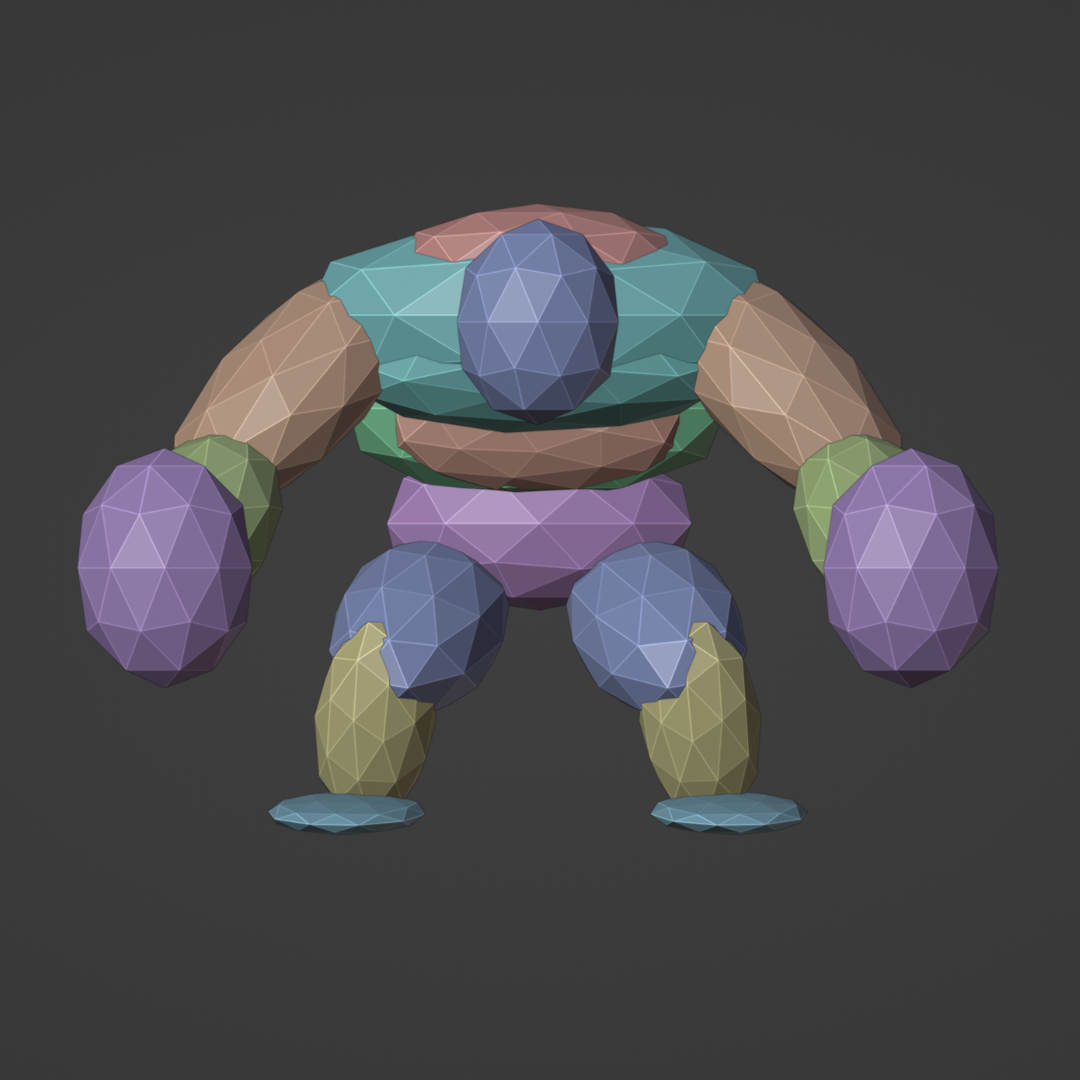
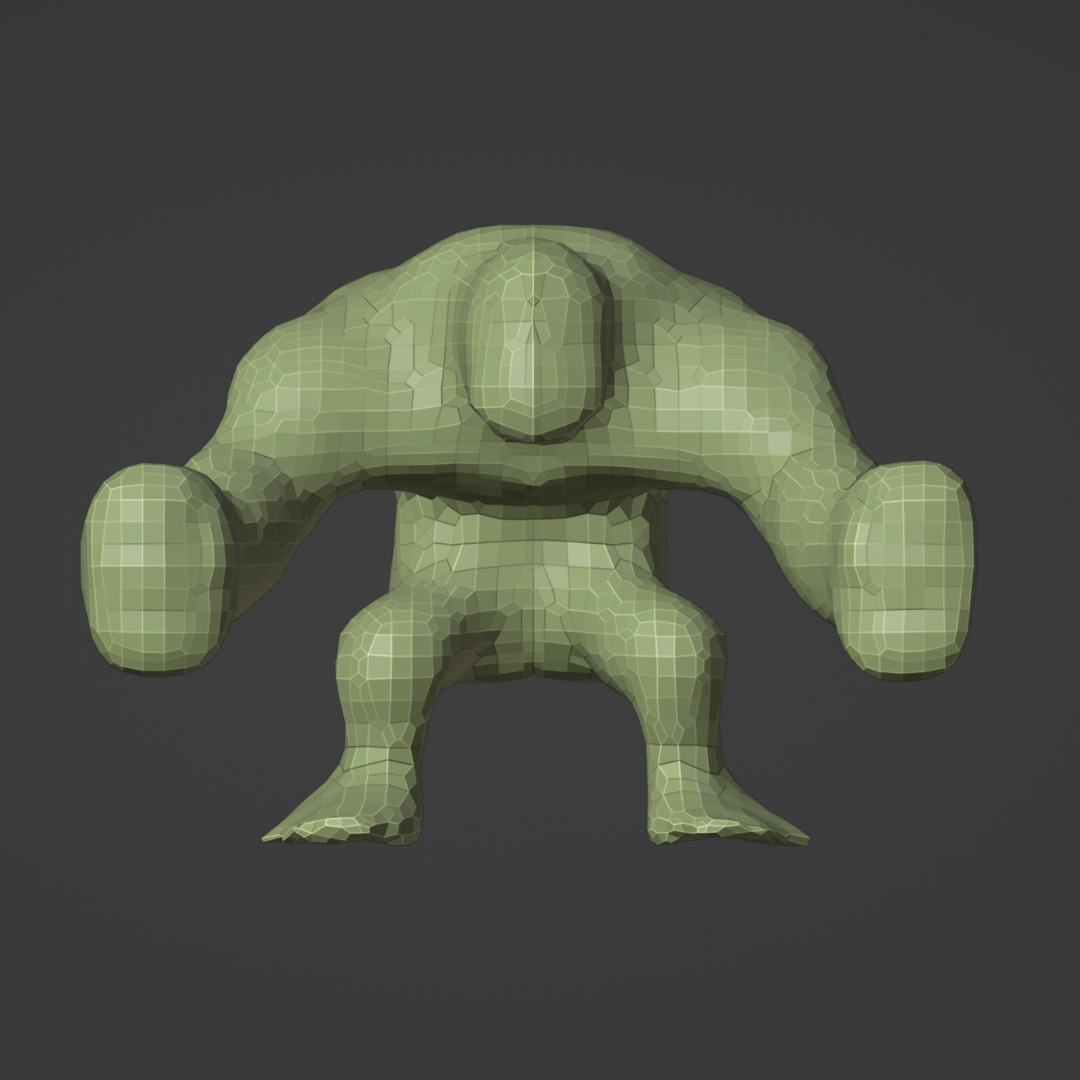
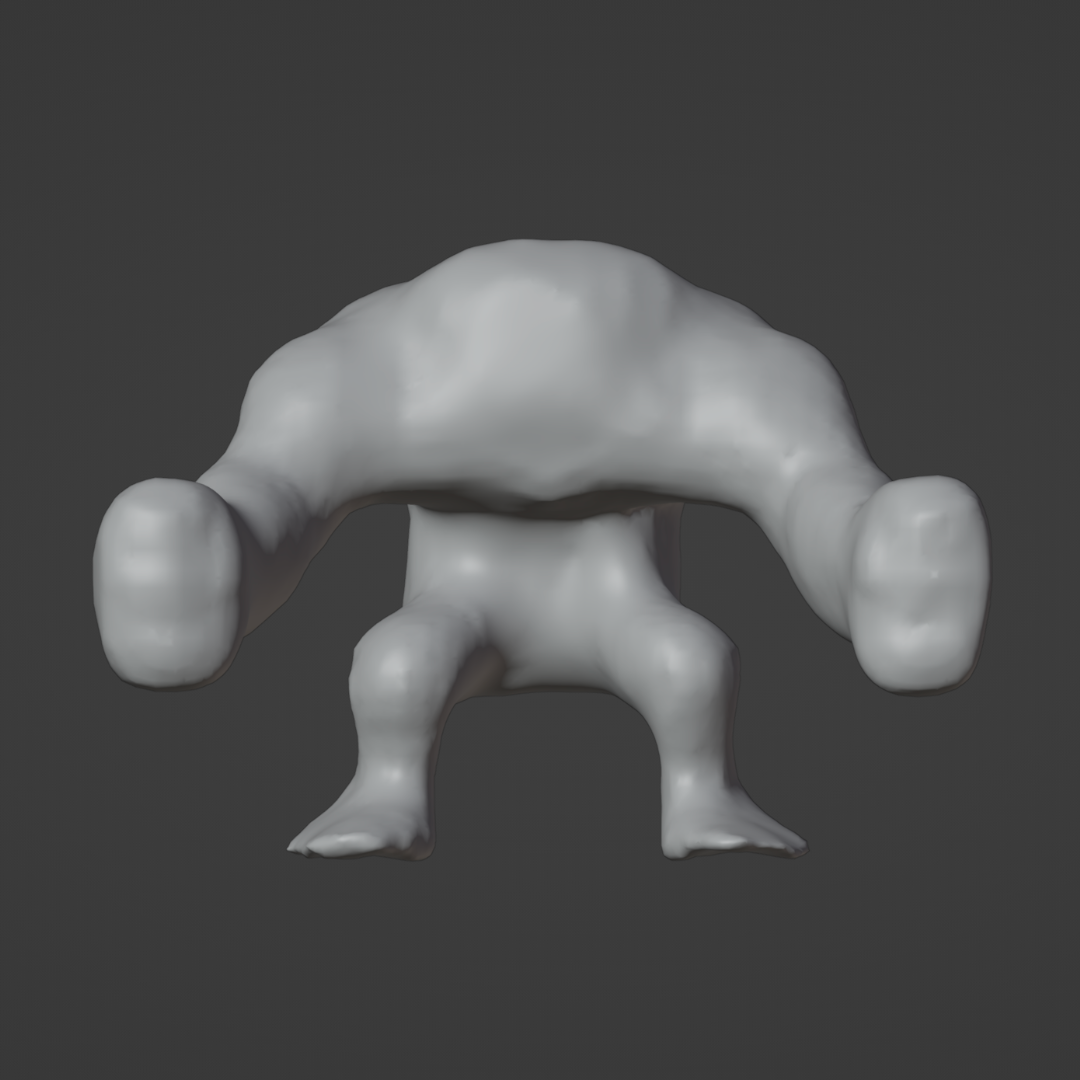
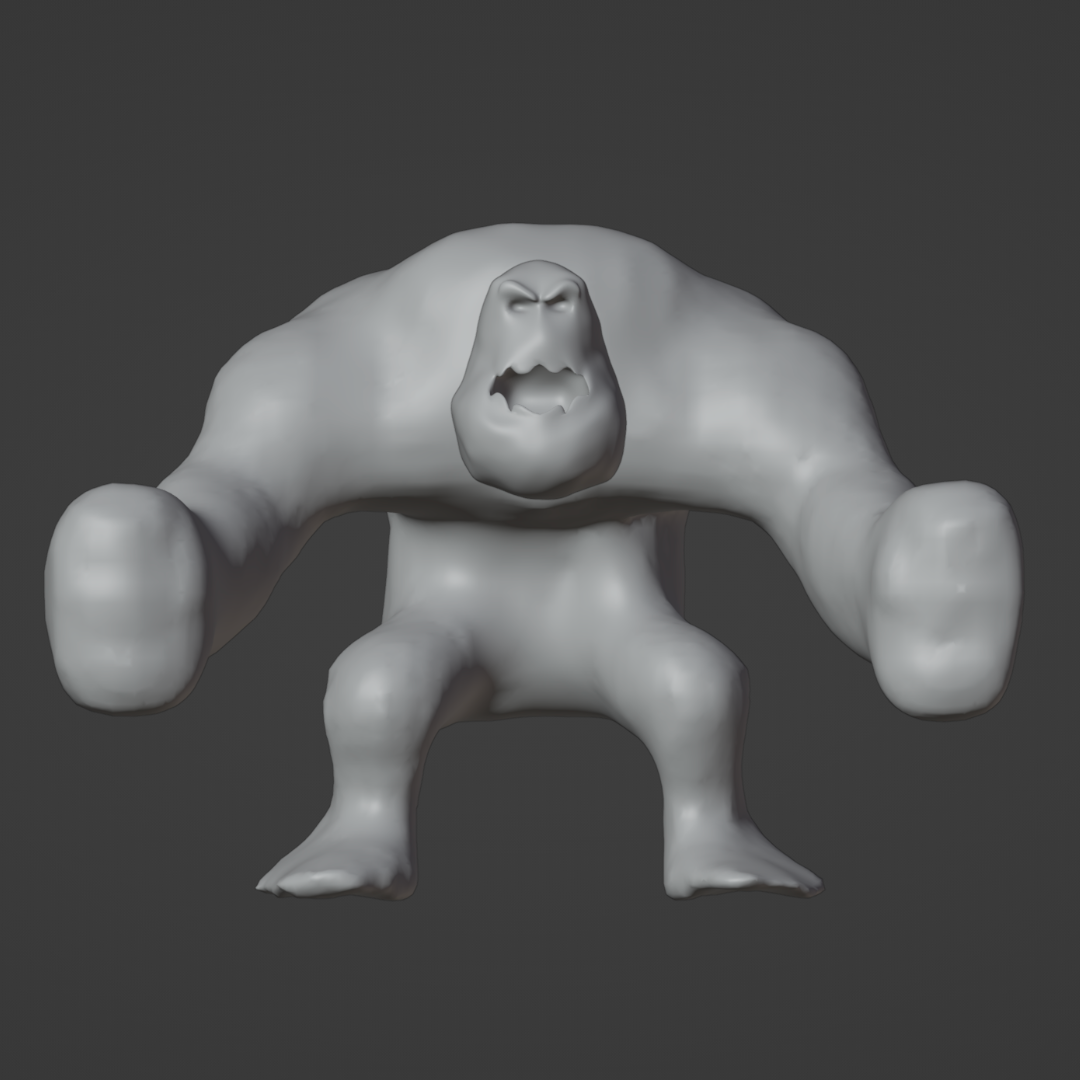
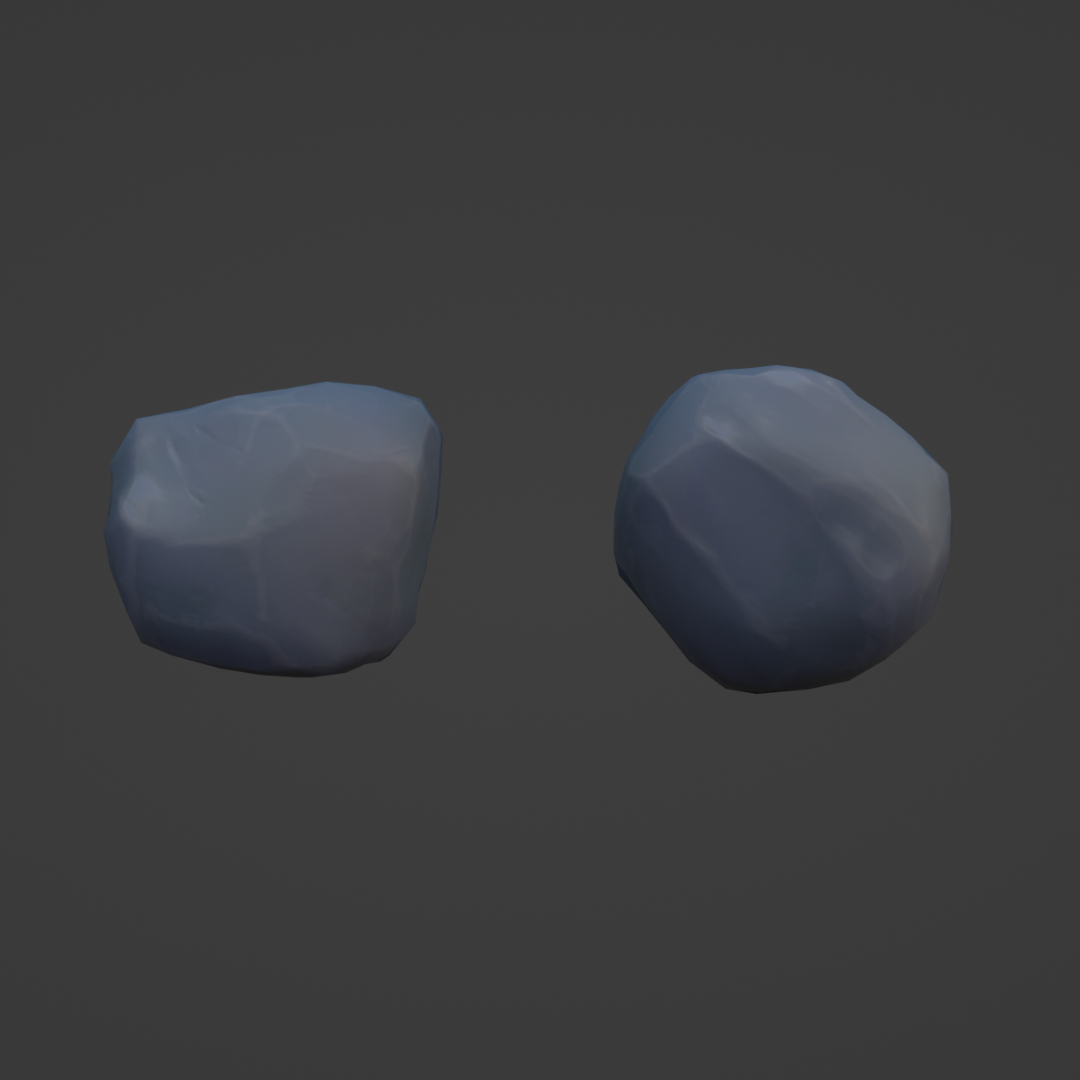
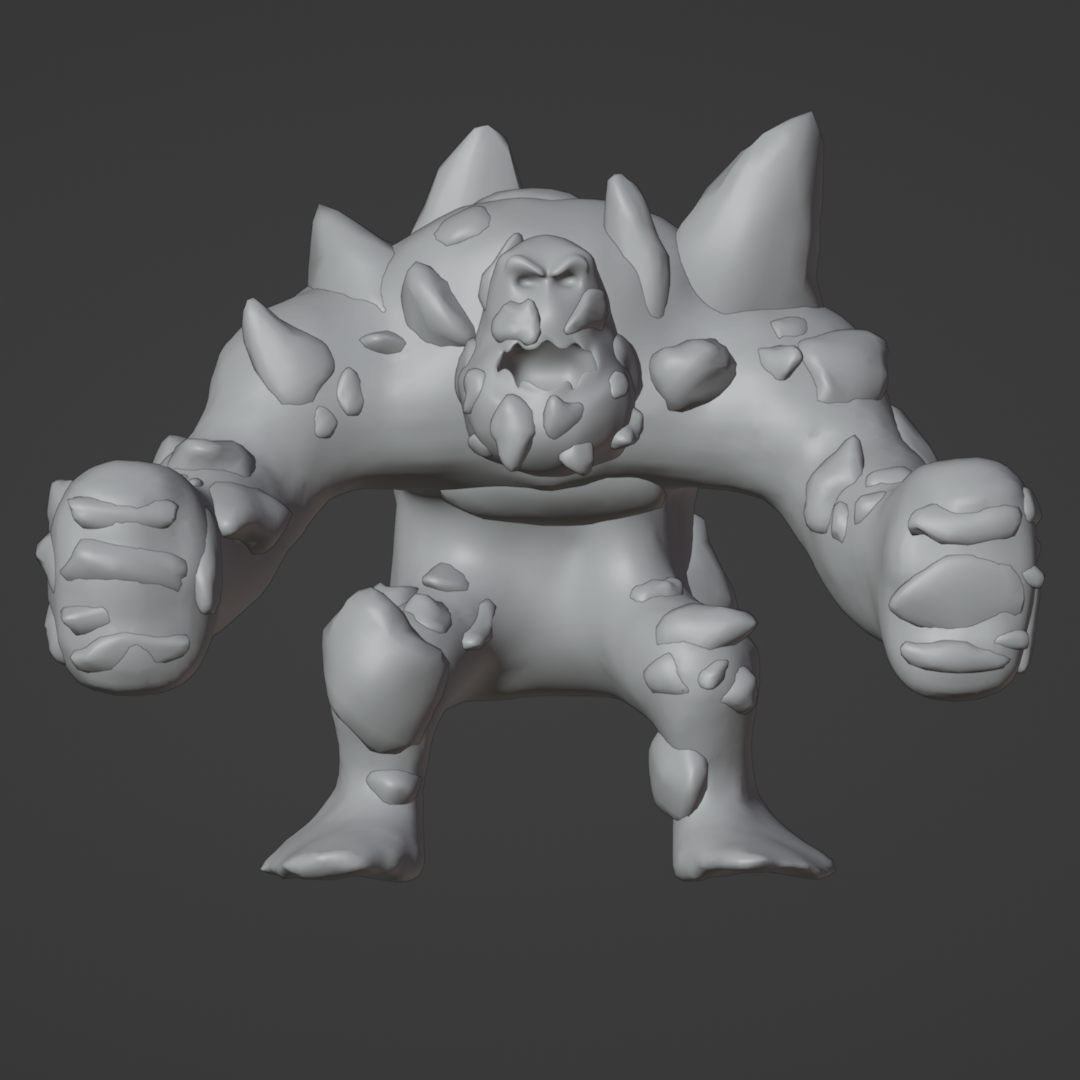
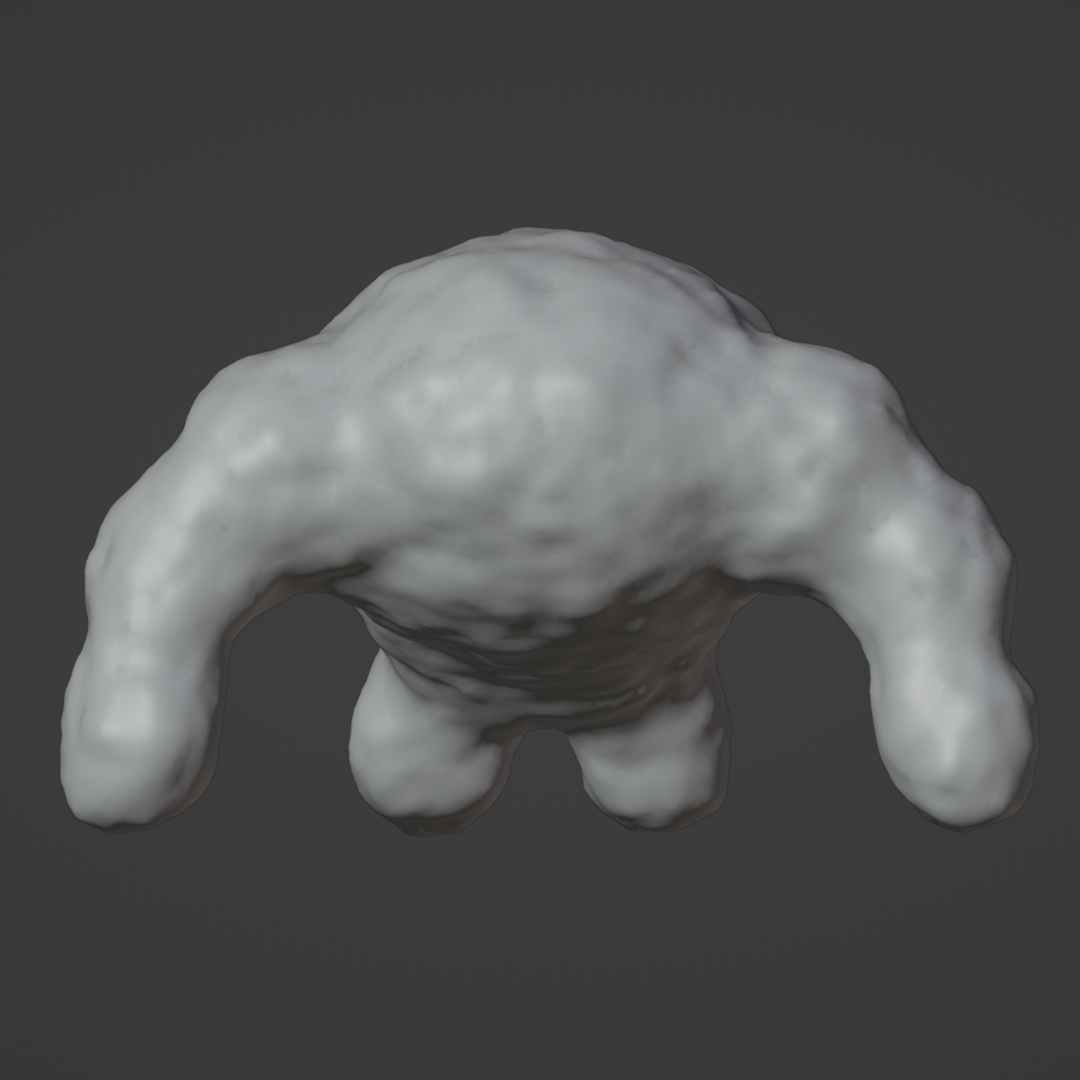
With the new model was complete, I used the smooth brush in sculpting mode to smooth out any areas that needed refining after the remeshing process. Taking into account what Rob had imagined the boss character to look like, we felt that the rocky lava texture alone wasn't enough, and the model looked a bit odd without some large rocks added to it. Initially, I planned to create a set of rocks myself for the character. But Rob suggested repurposing the rocks he had already made for the doorways, as they were finished models with textures. So, I took his advice and used those rocks. To ensure they didn't look identical to the doorways, I made some changes to their shape, size, and geometry. This included making some rocks slightly pointy and giving them flat edges to create irregularities. After placing enough rocks on the character, ensuring the placements were asymmetrical to give it a natural look, it was time to export the model and send it to Jacob so he could incorporate it into the animation he was working on. After the model was passed on to Jacob and he put it into his animation he was able to pass it further done the line to Shaz, who was then able to implement the model and the animation into the game ready for when needed.